


6
a
djusting the volume level of the subwoofer. The more
boost gained from the room, the lower the volume can
b
e set and the less hard the subwoofer has to work;
but there is a down side. Subwoofers positioned near
c
orners often generate more low-frequency room
r
esonances, making the bass more uneven with
frequency. There is no substitute for experiment as all
r
ooms behave differently, so the subwoofer should be
t
ried in a variety of positions before a final decision is
made. A piece of music with a bass line ascending or
d
escending the musical scale is useful for assessing
the smoothness of the bass response. Listen for
e
xaggerated or quiet notes.
If the subwoofer is to be used in a confined space
(e.g. built into furn
iture), the space must be ventilated
t
o allow sufficient air to circulate and cool the unit. Ask
your dealer for advice.
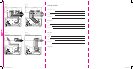
The subwoofer is intended to be floor mounted only. It
is important to ensure the subwoofer stands firmly on
the floor using the spike feet supplied whenever
possible. The spike feet are designed to pierce carpet
and rest on the floor surface. Initially, screw the lock
nuts onto the spikes enough to leave the nuts floating
just above the carpet when the spikes are resting on
the floor beneath. Screw the spikes fully into the
threaded inserts in the base of the cabinet. If the
cabinet rocks when placed on the floor, unscrew the
two spikes that do not touch the floor until the cabinet
rests firmly without r
ocking. Finally, lock the nuts
against the cabinet. It may be more convenient to fit
and adjust the spike feet after speaker positioning has
been optimised.
If there is no carpet and you wish to avoid scratching
the floor surface, use either a protective metal disc (a
coin perhaps) between the spike and the floor or use
the supplied rubber feet. Fit the rubber feet by
screwing one into each of the holes in the underside
of the cabinet.
The grille fitted to the front of the subwoofer may be
removed if desired. Take care however not to touch
the moving parts of the drive unit as damage may
result.
Using Multiple Subwoofers
Using multiple subwoofers in a single installation can
improve performance in the following ways:
• Maintain stereo separation to the lowest
frequencies.
• Smooth out the effects of low frequency room
resonances.
• Enable a higher maximum sound output.
In the case of two subwoofers used in a
2-channel audio system, stereo separation will only be
improved if each channel has its own subwoofer
located close to the appr
opriate satellite speaker
.
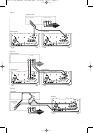
Electrical Connections
Disconnect all audio system equipment from the mains
until the signal connections have been made and
checked. This avoids the risk of damage whilst
connections are made or broken. The subwoofer can
a
ccept both line level signals via the RCA Phono
sockets (Item 11 in Figure 1) and speaker level signals
v
ia the binding posts (Item 12 in Figure 1). Use the
following guide to select the appropriate connection
m
ethod for your installation:
A
pplication: Home Theatre
S
ubwoofer connected to AV Processor with separate
power amplifiers: Figure 2
S
ubwoofer connected to AV Processor with integrated
power amplifiers:
• using line-level inputs: Figure 3
• using speaker level inputs: Figure 4
N
ote:
T
he subwoofer is always better connected via
i
ts line level inputs in home theatre applications.
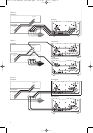
Application: 2-channel audio
Subwoofer connected to Integrated Amplifier:
• using line-level inputs: Figure 5
• using speaker level inputs: Figure 6
Two Subwoofers connected to Integrated Amplifier:
• using line-level inputs: Figure 7
• using speaker level inputs: Figure 8
Subwoofer connected to Pre/Power Amplifier:
• using line-level input: Figure 9
• using speaker level inputs: Figure 10
Two Subwoofers connected to Pre/Power Amplifier:
• using line-level inputs: Figure 11
• using speaker level inputs: Figure 12
Before Auditioning
Before auditioning your new subwoofer installation and
fine-tuning it, double check the connections. Make
sure in particular that:
1. The phasing is correct. If the speaker level inputs
are used, ensure that the positive terminals on the
subwoofer (marked + and coloured red) are
connected to the positive output terminals on the
amplifier and that the negative terminals on the
subwoofer (marked – and coloured black) are
connected to the negative output terminals on the
amplifier. Incorrect connection can result a
confused sound with poor bass.
2. Left to right channels are not confused. Left/right
confusion can result for example in orchestral
elements appearing in the wr
ong place in the
stereo image, or Home Theatre sound effects not
matching the action on scr
een.
Switching On and Of
f
Subwoofers ar
e best switched on after any other item
and switched off first. The On/Auto/Standby switch
(Item 2 in Figure 1) and Status Indicator (Item 1 in
Figur
e 1) operate as follows:
On: W
ith the switch to On, the subwoofer will r
emain
fully active and the indicator will glow green.
7276 10 CM manual revised.qxd 27/3/09 10:11 Page 6