


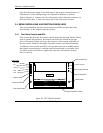

Hardware Implementation
Quantum DLT 7000 Tape Drive 2-23
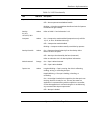
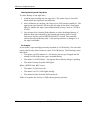
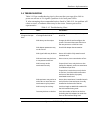
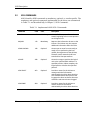
Table 2–9 LED Activity During Density Selection
If… Then…
The density Select Button
is not used
The lighted LEDs show the actual density when the tape is
being read from and written to. The LEDs light steadily;
Density Override LED remains off.
The density Select Button
is used and the actual
tape density is the same
as the density selected
via the button
The LED that reflects the actual density and the Density
Override both are lit. For example, if the actual density is
10.0 GB and 10.0 GB is selected via the Select Button, the
LED next to “10.0” lights.
The density Select Button
is used and the actual
tape density differs from
the density selected via
the button
The LED that reflects the actual density lights steadily. The
LED that reflects the SELECTED density blinks. The Density
Override lights steadily.
For example, if the actual tape density is 10.0 GB and the
selected density is 6.0 GB, the 10.0 LED lights steadily, the
6.0 LED blinks, and the Density Override LED lights steadily.
Selecting Density via the Host over the SCSI Bus
1. Use the SCSI MODE SELECT command to indicate the desired density
(Chapter 5).
2. Write data to the tape from BOT.
2.5 POWER ON SELF TEST (POST)
When power is applied to the tape drive, the drive performs a POST. POST
completes in about 15 seconds and the tape drive should respond normally to all
commands; POST is complete after Stage 2 in Table 2-10. However, it might take
longer for the media to become ready.
After a bus reset, the tape drive responds within a bus selection time-out period
(per the ANSI SCSI specification). A reset may have the Tape In Use indicator
blinking because a reset forces the tape to be rewound to BOT.
The following table lists the sequence of events: