


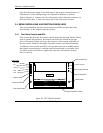

Hardware Implementation
2-22 Quantum DLT 7000 Tape Drive
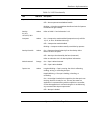
Selecting Density on the Tape Drive
To select density on the tape drive:
1. Load the tape cartridge into the tape drive. The amber Tape in Use LED
blinks while the tape loads and calibrates.
2. After calibration is complete, the Tape In Use LED remains steadily lit. The
appropriate tape density LED along the left edge of the drive’s front panel
lights to indicate the tape’s prerecorded density (if any), such as 2.6 GB or
6.0 GB.
3. Use the tape drive’s density Select Button to select the desired density, if
different than that indicated by the lighted tape density LED. Density
selection is inactive until a WRITE from BOT is issued. The controller
retains the selected density until 1) the density selection is changed, or 2)
the tape is unloaded.
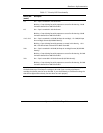
For Example:
A user loads a tape cartridge previously recorded at 2.6 GB density. The user then
presses the Density Select button to select 10.0 GB density. The following events
take place:
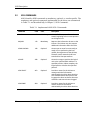
• The amber 2.6 LED remains lit – the density has not yet changed and the
steadily lit LED reflects the tape’s recorded density.
• The amber 10.0 LED blinks – this signals that a density change is pending.
• The amber Density Override LED lights.
When a WRITE from BOT occurs:
• The amber 2.6 LED turns off
• The amber 10.0/15.0 LED lights steadily
• The amber Density Override LED remains lit
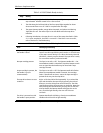
Table 2-9 explains the activity of LEDs during density selection.