


Operation: DN9344E
52
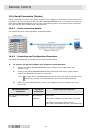
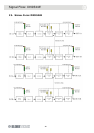
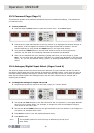
15.3. Password Page (Page 2)
This allows the presets to be password protected to prevent unauthorised editing. The password is
six characters long.
To set a password
1 Press and hold the SETUP button to open the Comms menu. Press SET UP again.
2 Press UP on the right-hand section of the unit (Section 2) to highlight the furthest left digit in
that section; a dot will appear at the base of the digit to show that is selected. Set the
desired character by using the UP and DOWN buttons in the right-hand section.
3 Using the UP and DOWN buttons in the left-hand section to move to the next/previous
character, set the other five remaining characters to complete the password.
4 When you are satisfied with your password (please make sure you don’t forget it), press
SETUP. You can then store the password (“OK SET”) by pressing the UP button in the left-hand
section. Or, you can exit without saving (“QUIT”) by pressing the UP button in the right-hand
section.
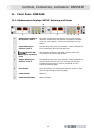
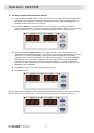
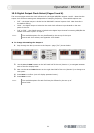
15.4. Analogue/Digital Input Select (Pages 3 and 4)
The next two pages set the input source and clock reference for input channels 1A and 1B, and 2A
and 2B on a paired basis due to the sharing of channels for AES/EBU inputs. Each input pair may be
switched between analogue and digital, and the clock reference may be set to a number of options.
Note that the default options are analogue input, with the clock reference set to internal and a
sampling rate of 48kHz.
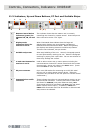
To change the settings for Inputs 1A and 1B
1 Step through the Set Up menus to the Input 1 page (“I1”) shown below:
2 Use the UP and DOWN buttons on the left-hand half of the unit (Section 1) to navigate between
each of the four display fields. For example, to change the input from analogue to digital,
move across to the “ALG” field.
3 Now use the UP and DOWN buttons on the right-hand half of the unit (Section 2) to change to a
new option, for example select “DIG”.
4 Press SETUP to confirm (unit will display password menu).
5 Press SETUP to exit.
Note The available options for each field may be affected by the set-up of
other fields.