


Installation
Runco X-200i Series Installation/Operation Manual 15
PRE
L
IMINAR
Y
3.2
Quick Setup
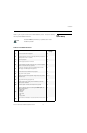
Table 3-1 gives a quick overview of the X-200i installation process. The sections following
this one provide detailed instructions.
Installation must be performed by a qualified custom video
installation specialist.
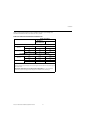
Table 3-1. Installation Overview
Step Procedure
For Details, Refer
to page...
1
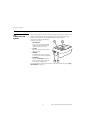
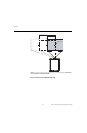
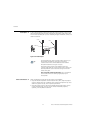
Choose a location for the projector 16
2
Install CineWide lens mounting assembly (stationary base plate or
AutoScope lens motor – optional)
23
3
Mount the projector 28
4
Connect signal sources to the X-200i 30
5
Connect external controller to RS-232 port; connect IR repeater
system to wired remote input (optional)
33
6
Connect 12-volt trigger output to retractable screen or other,
+12V trigger-activated equipment (optional)
34
7
Connect the Active 3D Emitter to the projector 35
8
Apply power to the projector 35
9
Primary lens adjustments: projected image size (zoom), position
(shift) and focus
19, 37
10
Change the OSD Language (optional) 38
11
For rear-screen and/or ceiling-mount installations, select the
proper picture orientation
39
12
Install and adjust secondary anamorphic lens (optional) 39
13
Projector calibration: adjust the following for each input; save
settings when finished:
• Aspect ratio
•Brightness
•Contrast
• Color level
•Tint
• Input position
52
14
Prepare Active 3D Glasses for use and test with 3D source mate-
rial
73
Note