


97
Setup Menu
Input Setup
—Continued
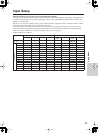
D.F. Mono
Here, you can specify the listening mode for playing
digital signals such as Dolby Digital and AAC recorded
in monaural. This option can be set for Main B and
Zone 2 as well as for Main A.
You can select from the listening modes listed below:
(Main A/B)
Pure Audio, Direct, Stereo, Mono (Default), Mono
Movie, Enhance, Orchestra, Unplugged, Studio-Mix, TV
Logic, All Ch Stereo, Full Mono, Dolby VS, and Last.
(Zone 2)
Direct, Stereo, Mono, Dolby VS, and Last.
D.F. Multiplex
Here, you can specify the listening mode for AAC
sound multiplex broadcasting (e.g., a bilingual
broadcast). This option can be set for Main B and Zone
2 as well as for Main A.
You can select from the listening modes listed below:
(Main A/B)
Pure Audio, Direct, Stereo, Mono, Multiplex (Default),
Mono Movie, Enhance, Orchestra, Unplugged, Studio-
Mix, TV Logic, All Ch Stereo, Full Mono, Dolby VS,
and Last.
(Zone 2)
Direct, Stereo, Mono, Multiplex, Dolby VS, and Last.
Multichannel
This item appears when the multichannel terminal
board [E] is inserted.
Here, you can specify the listening mode for analog
multichannel connection.
You can select from the listening modes listed below:
(Main A/B)
Pure Audio, Direct, Stereo, Mono, Multichannel
(Default), THX, Mono Movie, Enhance, Orchestra,
Unplugged, Studio-Mix, TV Logic, All Ch Stereo, Full
Mono, Dolby VS, and Last.
176.4/192 kHz
Here, you can specify the listening mode for playing
audio output signals at 192 kHz and 176.4 kHz such as
DVD-Audio. This option can be set for Main B and
Zone 2 as well as for Main A.
You can select from the listening modes listed below:
(Main A/B)
Pure Audio, Direct, Stereo, and Last.
(Zone 2)
Direct, Stereo, and Last.
Character Display
Specify whether or not the name given to an input
source should be displayed.
No
: The name given is not displayed. Only the name of
the input source is displayed.
Yes (Default)
: The name given is displayed when the
input source is replaced.
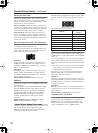
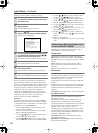
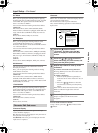
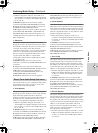
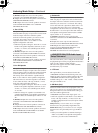
Character
When “Yes” is selected for “Character Display” above,
you can name the input source.
You are allowed to enter up to ten characters.
Carry out the following operations on the Character
Input screen:
To erase all the characters entered:
At step 1 above, press the [ ] button instead of the
[ ] button.
Character Edit Sub-menu
1
Press the [ ] button to select
“Character,” and then press the [ ]
button to display the Character Input
screen.
2
Press the [ ]/[ ]/[ ]/[ ] buttons to
select characters you want to enter, and
then press the [Enter] button.
3
Repeat step 2 above to enter up to ten
characters.
If you have selected the wrong character:
Pressing [Return] moves the cursor back to the
previous character.
To change a character:
1. Press the [Enter] button (repeatedly) to
locate the cursor on the character to be cor-
rected.
2. Press the [ ]/[ ] buttons to select the
new character, and then press the [Enter]
button.
If the name is shorter than ten characters, enter
blanks to make the length of the name ten
characters.
4
Press the [Setup] button.
Setup is complete, and the menu screen
disappears.
1
2
3
4
5
6
7
8
9
0
1
2
123456789012345678901234
2-4.Character Input
Input:VIDEO3
b.Character
:
ABCDEFGHIJKLM
NOPQRSTUVWXYZ
abcdefghijklm
nopqrstuvwxyz
0123456789-.'
()+*/=,:;!?_