


127
Using the Remote Controller
Operating Integra/Onkyo Products Using the Remote Controller
—Continued
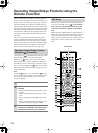
F
Play [ ] button
This button is used to start CD playback.
G
Stop [ ] button
This button is used to stop CD playback.
H
Random button
This button is used with the random playback func-
tion.
I
Memory button
This button is used with the memory playback func-
tion, which allows you to create a custom playlist of
tracks.
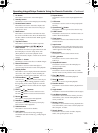
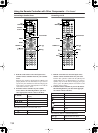
MiniDisc mode is used to control an Onkyo MiniDisc
recorder connected to the DTR-10.5 via .
To select
MiniDisc mode, press the [Mode] button, and then
roll the scroll wheel until “MD” appears on the dis-
play.
Note:
While neither the [Input] button nor [Mode] button is
illuminated, rolling the scroll wheel changes the input
source and remote controller mode simultaneously
(when you select “TAPE2” as the top line, “MD”
appears in the bottom line).
1
On button
This button is used to set the MiniDisc recorder to
On or Standby.
2
Number/letter buttons
These buttons are used to enter track numbers and
to enter times for locating specific points in time.
3
Mode button
This button is used with the scroll wheel to select
the remote controller modes. Press this button first,
and then roll the scroll wheel until “MD” appears
on the display.
4
Display button
This button is used to display information about the
current disc or track, including the elapsed time,
remaining time, total time, and so on.
5
Previous/Next [ ]/[ ] buttons
The Previous [ ] button is used to select the pre-
vious track. During playback it selects the begin-
ning of the current track. The Next [ ] button is
used to select the next track.
6
FR/FF [ ]/[ ]buttons
The FR [ ] button is used to start fast reverse.
The FF [ ] button is used to start fast forward.
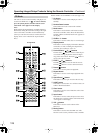
7
Pause [ ] button
This button is used to pause MiniDisc playback.
8
Rec [
●
] button
This button is used to start MiniDisc recording.
9
Repeat button
This button is used to set the repeat playback func-
tions.
0
Eject [ ] button
This button is used to set eject the MiniDisc.
A
LIGHT button
This button is used to turn on or off the remote con-
troller’s illuminated buttons.
B
Clear button
This button is used to cancel functions and to clear
entered numbers.
C
Input button
This button is used to select the input source. Press
this button first, and then roll the scroll wheel until
“TAPE2” appears on the display.
D
VOL button
This button is used to set the volume of the
DTR-10.5.
E
Muting button
This button is used to mute the DTR-10.5. This
function can be set only with the remote controller.
F Play [ ] button
This button is used to start MiniDisc playback.
G Stop [ ] button
This button is used to stop MiniDisc playback.
H Random button
This button is used with the random playback func-
tion.
I Memory button
This button is used with the memory playback func-
tion, which allows you to create a custom playlist of
tracks.
MiniDisc Mode