


90
Speaker/Output Setup
—Continued
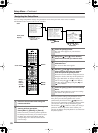
Perform the setup procedure below following the
operating instructions described on page 86.
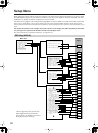
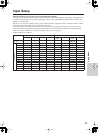
1. Select the unit of distance from “Unit.”
You can select either “feet” or “meters.” The default
varies depending on the region.
2. Set the distance you measured. Enter all the values
for every speaker you connected.
• For any speaker that is not available or set to “Not
Used” in the Speaker Configuration sub-menu, no
associated setting item is displayed.
• If “Surr Back” is set to “BTL for Front” or “Bi-Amp
for Front” on the Speaker Configuration sub-menu,
no item for surround back speakers is displayed.
When “feet” is selected:
Front L, Center, Front R, and Subwoofer can be set at
0.1 foot intervals in a range from 1.0 foot to 30.0 feet.
The default is 12.0 feet.
Surr R, Surr Back (or Surr Bk R and Surr Bk L), and
Surr L can be set at 0.1 foot intervals in a range from 1.0
foot to 30.0 feet. The default is 7.0 feet.
When “meters” is selected:
Front L, Center, Front R, and Subwoofer can be set at
0.03 meter intervals in a range from 0.30 meters to 9.00
meters. The default is 3.60 meters.
Surr R, Surr Back (or Surr Bk R and Surr Bk L), and
Surr L can be set at 0.03 meter intervals in a range from
0.30 meters to 9.00 meters. The default is 2.10 meters.
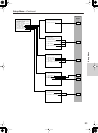
To configure the settings under the Notch Filter sub-
menu, a special measuring device is required. Usually,
leave these settings to their defaults, “Off.”
A notch filter cuts the signal of certain frequency ranges
and passes the rest of the signal through. Some
characteristics due to a room's environmental elements,
including walls and smallness of the room, cause a
signal peak in certain low frequencies to occur at the
resonance frequency, resulting in a boomy sound. The
filter reduces the signal at these frequencies causing the
boomy sound.
To know which frequency the peak occurs at, use a low
frequency sine wave generator and SPL (Sound
Pressure Level) meter to check the frequency and the
notch value.
Notch Filter
Off (Default):
Select this setting when not applying the
notch filter.
On:
Select this setting when applying the notch filter.
Frequency
When setting “Notch Filter” above to “On,” the notch
filer becomes effective at the frequency you specify
here. With your measuring device, the frequency value
can be set at 1 Hz intervals in a range from 20 Hz to 300
Hz. The default is 100 Hz.
Depth
When setting “Notch Filter” above to “On,” the notch
filter becomes effective at the value you specify.
You can specify intervals of 0.5 dB in a range from
–15 dB to 0 dB. The default is –10 dB.
Width
The available setting values are calculated based on
the values specified in the “Frequency” and “Depth”
settings above. You can choose any values according
to your favorite sound.
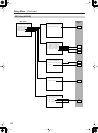
Use this sub-menu to set the volume for each speaker so
that each volume is heard by the listener at the same
level. This is especially important for speaker layouts
where the left and right speakers are at different distances
or in asymmetrical positions due to room designs and
configurations. These settings and the distance settings
performed in the Speaker Distance sub-menu are vital for
creating proper sound space and dynamics. The settings
in the Level Calibration sub-menu can be configured for
both “Main A” and “Main B.”
• These settings cannot be made when the sound is
muted, when you connect the headphones, and when
you use multichannel playback.
• You cannot use the [Master Volume] dial while you
perform the Level Calibration settings. These settings
are intended to bring sound levels between speakers
into balance so as to obtain the proper sound space.
•
This unit supports the THX format and the test
tone is output at a standard 0 dB (the Absolute
Volume value is 82). If you usually enjoy listening
at a lower level than the test tone, be careful of the
test tone’s sudden loud sound.
Note that the test
tone will be output immediately after pressing the
[Enter] button in step 1 below.
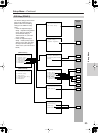
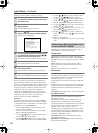
1. When you display this setting screen, select “Level
Calibration,” and press the [Enter] button, the display
changes to the Level Calibration screen, and at the
same time, a sound is emitted from the front left
speaker.
2. Starting with the front speaker, press the [ ]/[ ]
buttons to select a speaker, and press the [ ]/[ ]
buttons to set the volume level. When you have set all
connected speakers, the setup is complete.
You can adjust in the range from –12 dB to +12 dB in
0.5 dB step. The subwoofer can be adjusted in the range
from –15dB to +12 dB in 0.5 dB step.
• For any speaker that is not available or set to “Not
Used” in the Speaker Configuration sub-menu, no
associated setting item is displayed.
• If “Surr Back is set to “BTL for Front” or “Bi-Amp
for Front” on the Speaker Configuration sub-menu,
no item for surround back speakers is displayed.
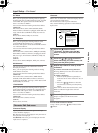
Notch Filter Sub-menu
Level Calibration Sub-menu