


13
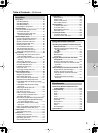
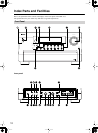
Index Parts and Facilities
—Continued
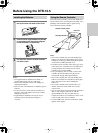
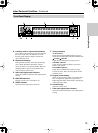
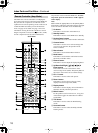
For further operational instructions, see the pages
indicated in brackets [ ].
1
Standby indicator [9, 52]
Lights when the DTR-10.5 is in the standby state
and when a signal is received from the remote
controller.
2
Standby/On button [52]
Press this button, the DTR-10.5 turns on and the
display lights up. If pressed again, the DTR-10.5
returns to the standby state. In the standby state, the
display is turned off and the DTR-10.5 cannot be
operated.
3
Remote control sensor [9]
4
Display button [56]
Press to display information about the current input
source signal. Each time you press the [Display]
button, the screen changes to show you different
information concerning the input signal.
5
Front display
6
Input source buttons and indicators (DVD,
Video 1-7, Tape 1-2, Tuner, Phono, CD, and
Net Audio) [52]
Press these buttons to select the input source for the
main zone.
After selecting the input source, the corresponding
indicator turns blue. If you select Zone 2, the
indicator turns green. If you select Zone 3 or Rec,
the indicator turns red.
7
Master Volume dial [52]
Use to control the volume in the main zone. The
volume for the remote zone (Zone 2 and Zone 3) is
independent.
8
Open button
Press this button to open the front panel door.
9
Pure Audio indicator
Lights during pure audio playback.
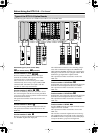
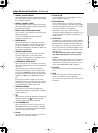
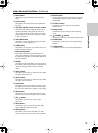
Inner panel
0
Listening Mode button [61]
Press this button to enter the setup mode for the
listening mode. Turning the [Select/Preset] allows
you to select the listening mode. To confirm your
selection and exit the setup mode, press the [Select/
Preset].
A
Audio Selector button [57]
Press this button to enter the audio selector mode.
Turning the [Select/Preset] allows you to select the
audio mode.
B
Tone button [54]
Press this button to enter the tone adjustment mode.
Turning the [Select/Preset] allows you to select the
channel to adjust the tone. To adjust the tone level,
turn the [Control/Tuning].
C
Zone 2 button [68]
Press this button to enter the Zone 2 configuration
mode. Turning the [Select/Preset] allows you to
select the input source for Zone 2. Also, if you want
to configure other Zone 2 settings such as standby/
on setting, listening mode, volume adjustment,
audio selector mode, and display settings, press this
button first.
D
Rec/Zone 3 button [68, 70]
Press this button to enter the Rec/Zone 3 mode.
Turning the [Control/Tuning] allows you to select
the input source for the Rec mode or Zone 3. Also,
if you want to configure the setting for Zone 3
including standby/on setting or volume adjustment,
press this button first.
Note:
Recording and Zone 3 operations uses the same
circuit and therefore cannot be used at the same
time.
E
Video 7 Input terminals [40]
For connecting a video camera or game device.
F
Zone 3 Level button [68]
Press this button to enter the volume adjustment
mode for Zone 3. Turning the [Select/Preset] allows
you to adjust the volume.
G
Control/Tuning dial
When the input source is FM or AM, turning this jog
dial allows you to select the frequency to receive.
When used with other buttons, this [Control/
Tuning] dial is used to select the mode settings or
values. Also the dial is pressed to confirm the
settings or values you select.
H
Setup button [86]
Press this button to enter the setup mode. First,
select the parameter to change by turning the
[Select/Preset] and press the [Select/Preset] to
confirm the parameter. Then, change the parameter
value by turning the [Control/Tuning] and press the
[Control/Tuning] to confirm the value.
Getting Started