


94
Input Setup
—Continued
Follow procedures below to change any setting:
Hint:
When you perform the procedures on the DTR-10.5,
after selecting the input source using the input source
buttons, press the [Setup] button. Next, select the menu
you want to configure by turning the [Select/Preset] dial
and press the dial to confirm the selection. Then, after
selecting the sub-menu you want to configure by
turning the [Select/Preset] dial, select your value by
turning the [Control/Tuning] dial, and press the dial to
confirm the value. If you want to go back to the
previous operation, press the [Exit] button.
Example 1
In assignment of a DVD recorder to input of VIDEO 1,
when the analog audio input is connected to “VIDEO
1,” the digital audio to “COAXIAL 2,” and the video to
“S VIDEO 2” and “COMPONENT 2.”
1. Press the [Input] button, and then roll the scroll
wheel to select “VIDEO 1.”
2. Press the scroll wheel, and then press the [Setup]
button to display the Main Menu.
3. Use the [ ]/[ ] buttons to select “Input Setup,”
and then press the [Enter] button.
4. Use the [ ]/[ ] buttons to select “Audio Assign”
from the sub-menu, and then press the [Enter] button.
5. Use the [ ]/[ ] buttons to select “Analog Audio,”
and then use the [ ]/[ ] buttons to select “1.”
6. Use the [ ]/[ ] buttons to select “Digital Audio,”
and then use the [ ]/[ ] buttons to select “Coax 2.”
7. Press the [Return] button to return to the sub-menu.
8. Use the [ ]/[ ] buttons to select “Video Assign,”
and then press the [Enter] button.
9. Use the [ ]/[ ] buttons to select “S-Video,” and
then use the [ ]/[ ] buttons to select “2.”
10. Use the [ ]/[ ] buttons to select “Component
Video,” and then use the [ ]/[ ] buttons to select
“RCA 2.”
11. Press the [Setup] button.
Setting is completed and the menu screen disap-
pears.
The following are settings for audio. When input is
“NET AUDIO,” see the following page.
Analog Audio
The following are settings for analog audio output:
Phono:
Select the device connected to “AUDIO IN PH.”
1-9:
Select the device connected to the jack of “AUDIO
IN 1-9.”
Front:
Select the device connected to the “Video 7
Input L-Audio-R” jack behind the front door of the
DTR-10.5.
No:
Select this when no device is connected.
Multichannel
This item appears when the multichannel terminal
board [E] is inserted. When the multichannel terminal
board contains a single set of multichannel terminals,
available options are “1” and “No.”
1:
Select the device connected to the jack of “MULTI-
CH IN 1.”
2:
Select the device connected to the jack of “MULTI-
CH IN 2.” This item is available when a multichannel
option board with two multichannel terminal sets is
installed.
No (Default):
Select this when no device is connected.
Surr Back Channel
This item appears when the multichannel terminal
board [E] is inserted.
The following are settings for “Multichannel 1” or
“Multichannel 2” described above, and cannot be
specified separately for each input source. For example,
when the input source is CD and “Surround Back
Channel” is set to “Not Used (5.1 ch)” for
“Multichannel 1,” switching the input source to DVD
and “Surround Back Channel” to “SBL/SBR (7.1ch)”
will also change “Surround Back Channel” associated
with CD to “SBL/SBR (7.1ch).”
Not Used (5.1 ch):
Select this when not using the
surround back channel.
SBL/SBR (7.1 ch) (Default):
Select this when using
the surround back channel.
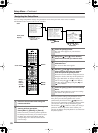
1
Press the [Input] button, and then roll the
scroll wheel to select the input source that
you want to set.
2
Press the scroll wheel, and then press the
[Setup] button.
The Main Menu appears onscreen.
3
Use the [ ]/[ ] buttons to select “Input
Setup,” and then press the [Enter] button.
The sub-menu is displayed.
4
Use the [ ]/[ ] buttons to select an item
you want to set, and then use the [ ]/[ ]
buttons to set the desired value.
Other items should be selected in the same way.
5
Press the [Return] button.
The display returns to the sub-menu.
6
Repeat procedures 4-5 to set desired
items sequentially.
When all of the items are set, go to procedure 7.
7
Press the [Setup] button.
Settings are completed and the menu screen disappears.
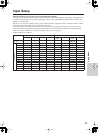
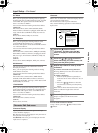
2.Input Setup
==Input:XXXXXX=======
1.Audio Assign
2.Video Assign
3.Listening Mode Preset
4.Character Edit
5.IntelliVolume
6.Delay
7.Picture Setting
8.12V Trigger Assign
Audio Assign Sub-menu (when input
is other than NET AUDIO)