


Getting Started Connections Settings Playback Remote ControlMulti-zone Information Troubleshooting SpecificationsPlayback
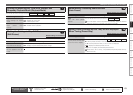
Tuning in Radio Stations – FM/AM Broadcasts
Listening to XM Satellite Radio
The channel switches continuously when [TU d] or [TU f] is pressed
and held.
The artist name, song title, category and reception level can be
checked by pressing <STATUS>.
The time (default : 30 sec) for which the GUI menus are displayed
can be set “GUI” – “Tuner” (vpage 54).
Press uio p to return to the original screen.
•
•
•
When operating XM with the AVR-4810CI via the main remote control
unit or sub remote control unit, use [SAT TU].
Before operating, set to [SAT TU] operating mode.
[SAT TU] of [INPUT SOURCE SELECT] and [SAT TU] of [DEVICE
SELECT] mode can use only either XM or SIRIUS. The default setting
is for SIRIUS operation.
1
Set GUI menu “Option Setup” – “Remote (SIRIUS/
XM)” (vpage 55) to “SAT TU : XM”.
2
Press [SOURCE SELECT] to display the GUI Source
Select menu, then select “ ” (vpage 31).
The input source becomes that set in step 1.
3
Set the main remote control unit to the “SAT TU”
mode (vpage 108 “Operating the Main Remote
Control Unit”).
You can then operate the input source you set in step 1.
4
Use [TU d] or [TU f] to select the channel.
When the channel is tuned in, the name of the song and artist
are displayed.
5
Adjust the items below.
Adjusting the master volume (vpage 85)
Selecting the surround mode (vpage 87)
Adjusting the Sound and Picture Quality
(vpage 90)
n
n
n
Direct Frequency Tuning
You can enter the receiving frequency directly to tune in.
1
Press [SEARCH].
2
Input frequencies by means of [0 ~ 9].
If o is pressed, the immediately preceding input is cancelled.b
3
When setting is completed, press ENTER.
The preset frequency is tuned in.
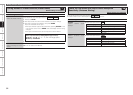
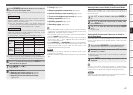
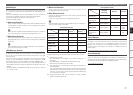
Default settings
Auto tuner presets
A1 ~ A8 87.5 / 89.1 / 98.1 / 107.9 / 90.1 / 90.1 / 90.1 / 90.1 MHz
B1 ~ B8
520 / 600 / 1000 / 1400 / 1500 / 1710 kHz, 90.1 / 90.1 MHz
C1 ~ C8 90.1 MHz
D1 ~ D8 90.1 MHz
E1 ~ E8 90.1 MHz
F1 ~ F8 90.1 MHz
G1 ~ G8 90.1 MHz
n
The strength of both the XM satellite and terrestrial signals can be
checked “Antenna Aiming” (vpage 64).
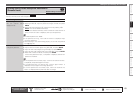
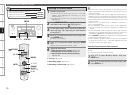
Checking the XM Signal Strength and Radio ID
1
Press <STATUS> until “SIGNAL” appears on the
display.
The display will switch as shown below, depending on the
reception conditions.
Display GUI Status
GOOD Signal strength is good
MARGINAL Signal strength is marginal
WEAK Signal strength is weak
NO No signal
2
Adjust the position of the antenna until “SIGNAL:
GOOD” is shown on the display.
3
Press <STATUS> until the channel (example:
“XM001”) is displayed.
4
Press [TU d] or [TU f] and select channel 0
(XM000).
The radio ID is shown on the display.
Radio ID