


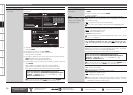

Getting Started Connections Settings Playback Remote ControlMulti-zone Information Troubleshooting SpecificationsSettings
Making Detailed Settings (Manual Setup)
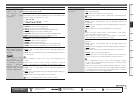
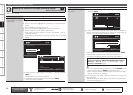
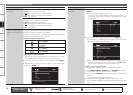
Main remote control unit
operation buttons
:Displaying the menu
Cancel the menu
:Moves the cursor
(Up/Down/Left/Right)
:Confirm the setting :Return to previous menu
Setting items Setting contents
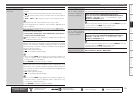
Network Connecting
(Continued)
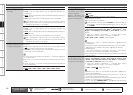
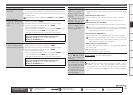
y Use i to select “Connection” and press ENTER.
Network connection starts.
When connection is established with the access point, “Connection
completed.” is displayed.
Exit
NETWORK CONNECTING
Detail
Terminate setup
Connection completed.
DHCP
192.168.100.85IP Address
Enter
ON
AVR-4810CI performs automatic network setup due to the DHCP
function.
When connecting to a network without a DHCP function, you will need
to manually configure the IP address.
For details, see page 49 “Wired LAN settings” in step 3.
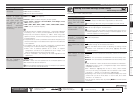
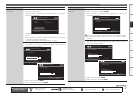
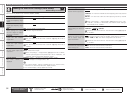
Wired LAN settings
Use this procedure to configure the Wired LAN settings.
1. Connect the LAN cable (vpage 26 “Connecting to a Home Network
(LAN)”).
2. Turn on the AVR-4810CI (vpage 28 “Turning the Power On”).
AVR-4810CI performs automatic network setup due to the DHCP
function.
When connecting to a network that has no DHCP function, perform the
setting in step 3.
3. Set the IP address at the “Network Connecting”.
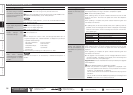
NETWORK CONNECTING
Exit
Detail
192.168.100.33
Set IP address and proxy manually
ONDHCP
IP Address
Enter
NETWORK CONNECTING
Proxy
Exit
192 . 168 . 100 . 033
Set IP address manually
OFFDHCP
IP Address
255 . 255 . 255 . 000Subnet Mask
000 . 000 . 000 . 000Default Gateway
000 . 000 . 000 . 000Primary DNS
000 . 000 . 000 . 000Secondary DNS
RETURN
Cancel
q
w
r e
See overleaf
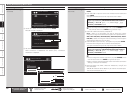
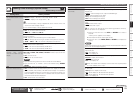
Setting items Setting contents
Network Connecting
(Continued)
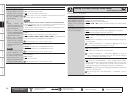
q On the GUI menu, select “Network Connecting” – “Detail” and
press ENTER.
w Use o p to set “DHCP” to “OFF”, then press i.
The DHCP function is disabled.
e Use uip to input the address and press ENTER.
IP Address
: Set the IP address within the ranges shown below.
The Network Audio function cannot be used if other IP addresses
are set.
CLASS A: 10.0.0.0 ~ 10.255.255.255
CLASS B: 172.16.0.0 ~ 172.31.255.255
CLASS C: 192.168.0.0 ~ 192.168.255.255
Subnet Mask : When connecting an xDSL modem or terminal
adapter directly to the AVR-4810CI, input the subnet mask
indicated in the documentation supplied by your provider. Normally
input 255.255.255.0.
Default Gateway : When connected to a gateway (router), input
its IP address.
Primary DNS, Secondary DNS : If there is only one DNS address
indicated in the documentation supplied by your provider, input it
at “Primary DNS”. If there are two or more DNS addresses, input
the first one at “Secondary DNS”.
r Use i to select “Exit” and press ENTER.
Setup is complete.
When connecting to the network via a Proxy server, select “Proxy” and
press ENTER (vpage 50 “Proxy settings”).
If you are using a broadband router (DHCP function), there is no need
to make the settings at “IP Address” and “Proxy”, since the DHCP
function is set to “ON” in the AVR-4810CI’s default settings.
If the AVR-4810CI is being used connected to a network without the
DHCP function, the network settings must be made. In this case, some
knowledge of networks is required. For details, consult a network
administrator.
If you cannot connect to the Internet, recheck the connections and
settings (vpage 26).
If you do not understand about Internet connection, contact your ISP
(Internet Service Provider) or the store from which you purchased your
computer.
When you want to cancel the setting during IP address input, press
RETURN.
•
•
•
•
b
•
•
•
•
•