


Getting Started Connections Settings Playback Remote ControlMulti-zone Information Troubleshooting SpecificationsSettings
Make the Optimal Speaker Settings, and Correct the Room Acoustics (Audyssey™ Auto Setup)
Do not remove the setup microphone until Audyssey Auto Setup is
completed.
When using headphones, unplug the headphones before starting
Audyssey Auto Setup.
•
•
1
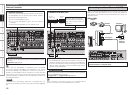
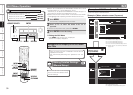
Check the speaker connections.
(vpage 14 “Speaker Connections”)
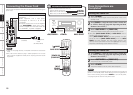
2
Turn on the TV and subwoofer power.
Change the TV input to AVR-4810CI input.
3
Turn on the AVR-4810CI power.
(vpage 28 “Turning the Power On”)
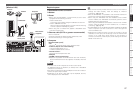
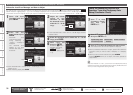
4
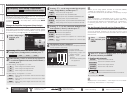
Connect the setup microphone to the SETUP MIC
jack of the AVR-4810CI.
“Audyssey Auto Setup”
screen is displayed when
you connect the setup
microphone.
Sound
receptor
a Connect the Included Setup
Microphone
NOTE
Loud test sounds may be played during Audyssey Auto setup. This is
part of normal operation. If there is background noise in room, these
test signals will increase in volume.
Do not stand between the speakers and setup microphone or allow
obstacles in the path while the measurements are being made. This
will cause inaccurate readings.
Make the room as quiet as possible. Background noise can disrupt
the room measurements. Close windows, silence cell phones,
televisions, radios, air conditioners, fluorescent lights, home
appliances, light dimmers, or other devices as measurements may
be affected by these sounds.
Cell phones should be placed away from all audio electronics during
the measurement process as Radio Frequency Interference (RFI)
may cause measurement disruptions (even if the cell phone is not
in use).
Operating MASTER VOLUME during the measurements will cancel
the measurements.
•
•
•
•
NOTE
Do not hold the microphone in your hand during measurements.
Avoid placing the microphone close to a seat back or wall as sound
reflections may give inaccurate results.
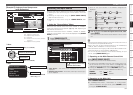
When you use two or three subwoofers, please adjust the
subwoofer volume controls individually so that each subwoofer level
is as close as possible to 75 dB using the test tone (vpage 42)
before Audyssey Auto Setup. If the subwoofer level error message
appears, please select “Skip” and then press ENTER.
•
•
•
If you subwoofer provides volume and crossover settings, set these
as shown below before starting Audyssey Auto Setup.
Volume setting : “12 o’clock” position” or the middle of the gain
knob’s range.
Low path filter setting is “Off”, or Crossover Frequency setting is
“Maximum/Highest Frequency”
Phase setting : 0°
Standby mode setting : “Off”
If you connect two or three subwoofers, the best results will be
achieved when:
Subwoofers are placed at equal distances from the main listening
position.
Individual level controls on the back of each subwoofer are set so
that each subwoofer plays at the same level.
•
•
•
•
•
•
•
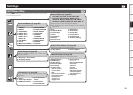
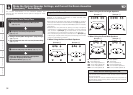
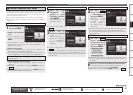
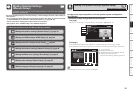
5
Mount the setup microphone on a tripod or stand
and place it in the main listening position.
When placing the setup microphone, adjust the height of the
sound receiver part to the level of the listener’s ear.
Setup
microphone