


30
En
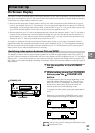
Setting Up for Surround Sound
To ensure the best possible surround sound, complete the following set up operations. You only need to make
these settings once (unless you change the placement of your current speaker system or add new speakers,
etc.). These set up operations use your TV to display the settings and choices so be sure your TV and amplifier
are properly hooked up.
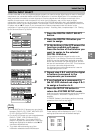
When you press SETUP OK to complete one of
the settings explained on the right, a mark
consisting of four curved lines appears on the
top right of the remote control. This means the
remote control is sending the commands to
the amplifier. If the amplifier has gotten the
commands the word “received” appears in the
display on the amplifier. During this process
you must keep the remote control pointed at
the amplifier so the command can be
communicated from the remote control to the
amplifier. To cancel press the BACK button,
you will return to the SYSTEM SETUP menu.
memo
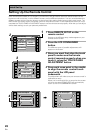
1
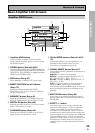
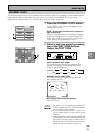
Turn on the amplifier and your TV,
press the AMP on the remote
control.
Make sure your TV is set to the amplifier.
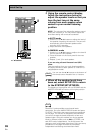
2
Press the SUB button on the
amplifier screen.
3
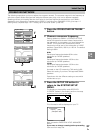
Press the SYSTEM SETUP button.
Access to the different set up modes appear on your
remote control screen. These set up possibilities will
also appear on your TV.
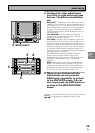
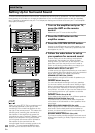
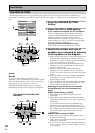
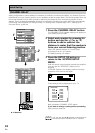
4
Follow the order below to set up
your speakers for surround sound.
In each mode, the current settings are displayed
automatically. We suggest you adjust all these
settings when you first hook up the amplifier. That
gets them out of the way and you won't need to
return to this setting mode unless you change your
home set up by adding new speakers (etc.).
DIGITAL INPUT SELECT (See p.31)
In order to use your digital components you must match
the numbered digital input buttons with the numbered
digital jacks used by your digital components.
SPEAKER SETTING (See p.32-33)
Use to specify the type and number of speakers you
connected.
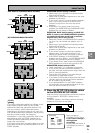
CHANNEL DELAY (See p.34)
You must add distance settings to all your speakers
for the most realistic surround sound. Adding a slight
delay to some speakers enhances sound separation
and is particularly important for achieving a surround
sound effect. You need to figure out the distance from
your listening position to your speakers to add the
proper delay.
CHANNEL LEVEL (See p.35-36)
Use to balance the volumes of your different speakers.
CROSSOVER NETWORK (See p.37)
This feature lets you select which bass frequencies
will be sent to the subwoofer or front speakers when
set to large.
BASS PEAK LEVEL MANAGER (See p.38)
Dolby Digital and DTS audio sources include ultra-low
bass tones. Set the bass peak level as needed to
prevent the ultra-low bass tones from distorting the
sound from the speakers.
DYNAMIC RANGE CONTROL (See p.39)
This feature makes possible excellent surround sound
effects when listening to Dolby Digital sources at low
volumes.
3
2
+
VOL
+
ENTER
AMP
DVD/LD
TV/SAT
VCR1
VCR2
REMOTE
SETUP
MD/TAPE1
CD
LINE/
TUNER
TV
CONTROL
FUNCTION
TV
CONTROL
MUTING
MASTER VOLUME
SYSTEM
OFF
MULTI
OPERATION
STANDBY/ON
–
VOL
–
CH
–
CH
+
FUNCTION
BACK LIGHT
use lock
on/off
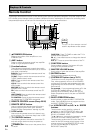
Amplifier
MAIN SUB
DSP STEREO
THX
ADVANCED
THEATER
EFFECT
STANDARD
MIDNIGHT
LOUDNESS
MULTI CH
IN
SIGNAL
SELECT
DIGITAL
NR
/ dts/MPEG
4
1
AMP
DVD/LD
TV/SAT
VCR1
VCR2
REMOTE
SETUP
MD/TAPE1
CD
LINE/
TUNER
TV
CONTROL
System Setup
SPEAKER
SETTING
CROSSOVER
NETWORK
BASS PEAK LEVEL
MANAGER
DYNAMIC RANGE
CONTROL
DIGITAL INPUT
SELECT
CHANNEL DELAY
CHANNEL LEVEL
BACK
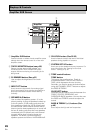
Initial Set Up
AMP
DVD/LD
TV/SAT
VCR1
VCR2
REMOTE
SETUP
MD/TAPE1
CD
LINE/
TUNER
TV
CONTROL
SPEAKER
A/B
TONE
CH
SELECT
Amplifier
MAIN SUB
TREBLE
SYSTEM
SETUP
CH
LEVEL
INPUT
ATT.
BASS
FL
DIMMER
TAPE 2
MONITOR