


26
En
Displays & Controls
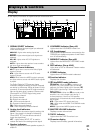
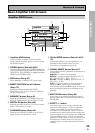
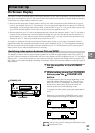
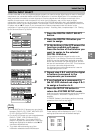
Amplifier SUB Screen
SPEAKER
A/B
TONE
CH
SELECT
MAIN SUB
TREBLE
SYSTEM
SETUP
CH
LEVEL
INPUT
ATT.
BASS
FL
DIMMER
TAPE 2
MONITOR
Amplifier
1
2
3
4
5
6
7
8
1 Amplifier SUB button
Press this button to select the sub amplifier screen
(above) when the remote control is on the main
amplifier screen.
2 TAPE 2 MONITOR button (see p.66)
Selects the tape deck (or MD recorder, etc.)
connected to the TAPE 2 MONITOR inputs/
outputs. Allows monitoring of a recording as it's
being made.
3 FL DIMMER button (See p.51)
Use to adjust the brightness of the main
display.
4 INPUT ATT button
Use to lower the input level of an analog signal
that is too powerful, thus causing the amplifier to
distort (the overload indicator will be flashing
furiously).
5 SPEAKER A/B button
Use to select the speaker system. A is the
primary setting. It plays all speakers hooked up
to the A system. A & B setting only plays the
front speakers of both the A & B systems and
the sub-woofer. Multi channel sources will be
down-mixed to these speakers so no sound will
be lost. B setting only plays the front speakers
connected to the B system and multi channel
sources will be down-mixed to these two
speakers. The button cycles through the
speaker systems as follows: A]B]A&B]off.
6 CH LEVEL button (See 35-36)
Use this feature to adjust the level of individual
speakers during playback of a source.
7 SYSTEM SET UP button
Use to set up the speaker and sound systems. For
more information see “Setting for Surround
Sound“
starting on p. 30.
8 TONE control buttons
TONE button
This button has two functions. Firstly, it
switches between TONE on and TONE BY-
PASS, which bypasses the tone circuitry.
Secondly, you need to press the button before
using the CHANNEL SELECT buttons to adjust
the BASS & TREBLE.
CH SELECT button
Switches the tone adjust controls between the
FRONT, CENTER, SURROUND and
SURROUND BACK speakers. You can then use
the BASS and TREBLE controls to adjust the
sound.
BASS & TREBLE (+/–) buttons (See
p.49)
Use to adjust the high and low frequencies.