


74
Enjoying Net Audio
—Continued
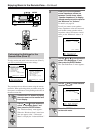
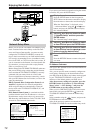
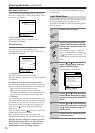
MAC Address Sub-menu
You can view the assigned MAC address. Every net-
work port is identified by a unique MAC address (This
is read-only information).
a. MAC Address
Displays the MAC address assigned to your
TX-NR801/TX-NR801E.
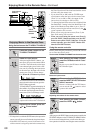
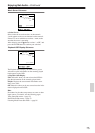
Client Sub-menu
A client is a device that receives information from a
sever. One server can serve multiple clients.
Throughout this guide, the term “client” refers to your
TX-NR801/TX-NR801E.
a. Client Name
Shows the name used on Net-Tune Central.
The client name has already been set by the TX-NR801/
TX-NR801E.
b. Wakeup on LAN (Network connection status)
Sets whether to leave the network connection open or not
while the TX-NR801/TX-NR801E is in the standby state.
On:
Leaves the network connection open.
Off:
Closes the network connection while the
TX-NR801/TX-NR801E is in the standby state. You
can save power consumption during standby state.
c. NTSP Port
You can change the TCP/IP port number used for com-
municating with Net-Tune Central. Be sure to match the
port number set here with the port number set on Net-
Tune Central. When you change the port number set-
tings, press the button to display the NTSP Port
Input menu.
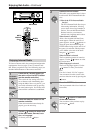
Select a number using the
/ buttons, and press the
ENTER button to enter the number.
After all the necessary numbers are entered, the
TX-NR801/TX-NR801E exits the number-entry mode.
After the necessary settings are complete, press the
RETURN button to go back to “5. Network Setup
Menu,” select “
→
Save Settings,” and press the
ENTER button to save the setting you made.
Never turn off the TX-NR801/TX-NR801E while sav-
ing the settings.
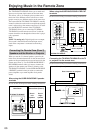
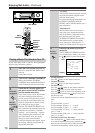
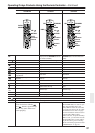
The illustrations used here represent the remote control-
ler. When you perform the procedures on the
TX-NR801/TX-NR801E, use the corresponding buttons
on the front panel.
1
2
3
4
5
6
7
8
9
0
1
2
123456789012345678901234
5-3.MAC Address
a.MAC Address
:XX:XX:XX:XX:XX:XX
Quit:[SETUP]
5-4.Client Setup
a.Client Name
:TX-NR801/XXXXXX
b.Wakeup on LAN
:Off
c.NTSP Port
:XXXXXX
Quit:[SETUP]
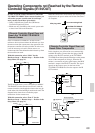
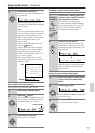
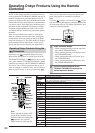
Input Setup Menu
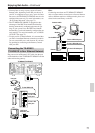
1
Press the NET A button.
2
Press the RCVR button, and then
press the SETUP button to display
the main menu on the monitor and
front display.
When the “Basic Menu” is displayed,
select “
→
Advanced Menu” using the
and cursor buttons and press the
ENTER button to display the “Advanced
Menu.”
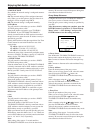
3
Use the and cursor buttons to
select “2. Input Setup” and then
press the ENTER button.
The “Input Setup” menu appears.
4
Use the and cursor buttons to
select the sub-menu that you want
to enter and then press the ENTER
button.
5
Use the and cursor buttons to
select an item and then use the
and cursor buttons to set the
desired value.
6
Press the SETUP button to return
to the main menu.
2.Input Setup
1.Music Server
2.Playback OSD Display
3.Video Setup
4.IntelliVolume
5.Listening Mode Preset
[ENTER]Quit:[SETUP]
Advanced Menu