


72
Enjoying Net Audio
—Continued
Before you can use the TX-NR801/TX-NR801E to play
music contained in the music library on the Net-Tune
server and listen to Internet radio, you must correctly
configure the TX-NR801/TX-NR801E’s network set-
tings so that it can connect to your LAN and the Internet.
It is strongly recommended to use a broadband connec-
tion (via an xDSL or CATV leased line) and a router. If
you are connected to the Internet via a narrowband dial-
up connection, you may not be able to enjoy Internet
radio as you expect or at all.
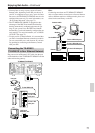
Before setting up the TX-NR801/TX-NR801E, make sure
that you are already using a router that provides Internet
access and that the TX-NR801/TX-NR801E is correctly
connected with your router or hub via a LAN cable.
For more information on Internet connectivity, consult
with your ISP (Internet Service Provider) or refer to the
router documentation.
DHCP (Dynamic Host Configuration Protocol)
and
AutoIP
are mechanisms for network configuration,
which assign IP addresses automatically to network
devices such as the TX-NR801/TX-NR801E, PC, and
broadband router.
DNS (Domain Name System)
is a mechanism which
translates domain names into IP addresses or vice versa.
Domain names such as www.onkyo.co.jp are used for
Web browsing, and IP addresses such as 210.199.170.69
are used for actual network data transfer.
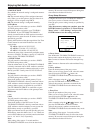
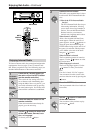
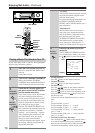
If you want to perform these operations using the remote
controller, first press the RCVR button.
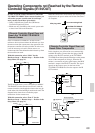
IP Address Sub-menu
You can use this submenu to turn on/off the DHCP and
Auto IP functionality.
Also, you can use this menu to manually configure net-
work settings. Referring to the documentation from
your ISP, enter the IP address and subnet mask assigned
to your TX-NR801/TX-NR801E as well as the IP
addresses of the default gateway and DNS server.
After the necessary settings are complete, press the
RETURN button to go back to “5. Network Setup
Menu,” select “
→
Save Settings, ” and press the
ENTER button to save the setting you made.
When you set a. DHCP/AUTO IP to Off, select a menu
item under b. and press the ENTER or button; the
TX-NR801/TX-NR801E will enter the number-entry
mode.
Select a number using the / buttons, and press the
ENTER button to enter the number.
After all the necessary numbers are entered, the
TX-NR801/TX-NR801E exits the number-entry mode.
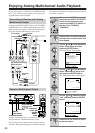
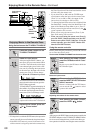
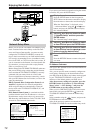
Network Setup Menu
DSP
A
-
FO
RM LISTENING MODE MEMORY
THX
SURROUNDDIRECT
/
PURE AUDIOSTEREO
FM
MODE
MEMORY
ENTER
RE
TURN
SETUP
TUNING
PRESET
SETUP
ENTER
///
SETUP
ENTER
///
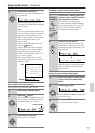
5.Network Setup
1.IP Address
2.Proxy Setup
3.MAC Address
4.Client Setup
→
Save Settings
[ENTER]Quit:[SETUP]
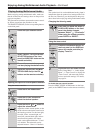
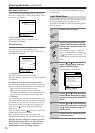
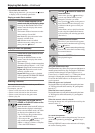
Advanced Menu
0.Hardware Setup
1.Speaker Setup
2.Input Setup
3.Audio Adjust
4.Preference
5.Network Setup
[ENTER]Quit:[SETUP]
→
Basic Menu
1
Display the main menu.
Press the SETUP button on the front panel or
SETUP button on the remote controller to display
the main menu on the monitor and front display.
When the “Basic Menu” is displayed, select
“
→
Advanced Menu” using the and cursor
buttons and press the ENTER button to display
the “Advanced Menu.”
2
Use the and cursor buttons to select
“5. Network Setup” and then press the
ENTER button.
The “Network Setup” menu appears.
3
Use the and cursor buttons to select
an item and then press the ENTER button.
4
Use the and cursor buttons to select
an item and then use the
and
cursor
buttons to set the desired value.
5
Press the SETUP button to exit the Setup
menu.
Press the RETURN button to return to the previ-
ous menu.
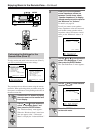
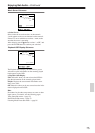
5-1.IP Address
a.DHCP/AUTO-IP :On
b.IP Address
:192.168. 9. 10
c.SUBNET Mask
:255.255.255. 0
d.Gateway
:192.168. 9. 1
DNS Server
e.1st:192.168. 9. 1
f.2nd: 0. 0. 0. 0