


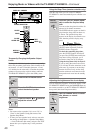

34
Selecting the Appropriate Setting for Your Connections—Continued
d. Right
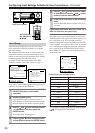
Set the distance from the front right speaker to your
normal listening position. This can be set between 1 and
30 feet in 0.5 feet increments (between 0.3 and 9 meters
in 0.15 meter increments).
e. Surr Right
Set the distance from the surround right speaker to your
normal listening position. This can be set between 1 and
30 feet in 0.5 feet increments (between 0.3 and 9 meters
in 0.15 meter increments).
f. Surr Back R
Set the distance from the surround back right speaker to
your normal listening position. This can be set between
1 and 30 feet in 0.5 feet increments (between 0.3 and 9
meters in 0.15 meter increments).
g. Surr Back L
Set the distance from the surround back left speaker to
your normal listening position. This can be set between
1 and 30 feet in 0.5 feet increments (between 0.3 and 9
meters in 0.15 meter increments).
Note:
If the Surr Back/Zone 2 setting in the Surr Back/Zone 2
Sub-menu of the Hardware Setup Menu is set to “Zone
2,” then the Surr Back R and Surr Back L settings will
not be displayed.
h. Surr Left
Set the distance from the surround left speaker to your
normal listening position. This can be set between 1 and
30 feet in 0.5 feet increments (between 0.3 and 9 meters
in 0.15 meter increments).
i. Subwoofer
Set the distance from the subwoofer to your normal
listening position. This can be set between 1 and 30 feet
in 0.5 feet increments (between 0.3 and 9 meters in 0.15
meter increments).
Level Calibration Sub-menu
Use this sub-menu to set the volume for each speaker so
that each volume is heard by the listener at the same
level. This is especially important for speaker layouts
where the left and right speakers are at different dis-
tances or in asymmetrical positions due to room designs
and configurations. These settings and the distance set-
tings performed in the Speaker Distance Sub-menu are
vital for creating proper sound space and dynamics.
• These settings cannot be made when the sound is
muted, when you connect the headphones, and when
you use multichannel playback.
• You cannot use the MASTER VOLUME dial while
you perform the Level Calibration settings. These
settings are inteded to bring sound levels between
speakers into balance so as to obtain the proper sound
space.
• This unit supports the THX format and the test tone is
output at a standard 0 dB (the Absolute Volume value
is 82). If you usually enjoy listening at a lower level
than the test tone, be careful of the test tone’s
sudden big sound. Note that the test tone will be
output immediately after pressing the ENTER button
in step 1 below.
Notes:
• Speakers for which you selected “No” or “None” in
the Speaker Config Sub-menu cannot be selected.
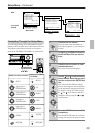
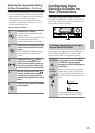
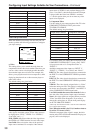
1-3.Level Calibration
a.Left : 0dB
b.Center : 0dB
c.Right : 0dB
d.Surr Right : 0dB
e.Surr Back R : 0dB
f.Surr Back L : 0dB
g.Surr Left : 0dB
h.Subwoofer : 0dB
Quit:[SETUP]
1
Use the and cursor buttons to select
“3. Level Calibration” on the sub menu
and then press the ENTER button.
The “Level Calibration” menu appears.
You will hear a pink noise from the front left
speaker. At this time, the volume of the pink noise
will automatically increase to a predetermined
reference level (82).
Note:
Speakers for which you selected “No” or “None”
in the “Speaker Config” menu will be disabled.
2
Use the and cursor buttons to select
“Left.”
Remember the volume level of this noise and then
press the cursor button. (Note that this can be
adjusted to any level between –12 and +12
decibels in 1 decibel increments. For subwoofer,
values between –15 and +12 dB can be set.) The
TX-NR801/TX-NR801E will now emit the pink
noise from the center speaker.
3
Using the and cursor buttons,
adjust the volume level of the noise from
the center speaker so that it is at the same
level as that emitted from the front left
speaker.
You can go back and forth between the speakers
to help you compare the volume levels.
4
Press the cursor button again.
The TX-NR801/TX-NR801E will now emit the
pink noise from the front right speaker.
5
Repeat steps (3) and (4) above for the
front right and other speakers until all
speakers are adjusted to the same volume
level.