


56
Input Setup (Advanced)
With the TX-NR801/TX-NR801E, you can set a different
listening mode for each different signal type that comes
from each input source. For example, if your DVD player
also plays compact discs and the DVD video signal is
Dolby Digital and the compact disc signal is PCM, then
you can set a different listening mode for each.
This is especially convenient if you frequently play the
same types of movies or music.
Once the TX-NR801/TX-NR801E enters the standby
state, the listening mode returns to the mode set at “Lis-
tening Mode Preset,” even after you changed the listen-
ing mode to a different listening mode while playing.
The illustrations used here represent the remote control-
ler. When you perform the procedures on the
TX-NR801/TX-NR801E, use the corresponding buttons
on the front panel.
a. Analog/PCM
Analog sources consist of LP records, FM and AM
broadcasts, cassette tapes, and the like. PCM (Pulse
Code Modulation) is one form of digital audio signal and
is recorded directly onto compact discs and DVDs with-
out compression.
Available listening modes for “Analog/PCM” are Stereo,
T-D, PL II/Neo:6, THX, Mono Movie, Enhance, Orches-
tra, Unplugged, Studio-Mix, TV Logic, All Ch Stereo,
Mono, Pure Audio, and Direct.
b. PCM fs=96k
Digital PCM sources recorded with a sampling rate of 96 kHz.
Available listening modes for “PCM fs=96k” are Stereo,
PL II, Pure Audio, and Direct.
Configuring the Listening Modes You
Use Frequently
(Listening Mode Preset)
1
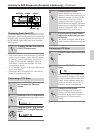
First, press the RCVR button, and then
press the INPUT SELECTOR button.
DSP
A
-
FO
RM LISTENING MODE MEMORY
THX
SURROUNDDIRECT
/
PURE AUDIOSTEREO
FM
MODE
MEMORY
ENTER
RE
TURN
SETUP
TUNING
PRESET
SETUP
ENTER
SETUP
RCVR
ENTER
///
///
Input source
buttons
INPUT
SELECTOR
buttons
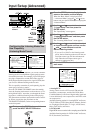
2.Input Setup
1.Digital Setup
2.Multichannel Setup
3.Video Setup
4.Character Input
5.IntelliVolume
6.Listening Mode Preset
[ENTER]Quit:[SETUP]
Input:DVD
Advanced Menu
0.Hardware Setup
1.Speaker Setup
2.Input Setup
3.Audio Adjust
4.Preference
5.Network Setup
[ENTER]Quit:[SETUP]
→
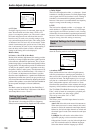
Basic Menu
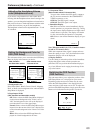
2
Press the SETUP button to display the main
menu on the monitor and front display.
When the “Basic Menu” is displayed, select
“→Advanced Menu” using the and cursor
buttons and press the ENTER button to display the
“Advanced Menu.”
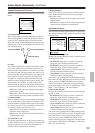
3
Use the and cursor buttons to select
“2. Input Setup” and then press the
ENTER button.
The “Input Setup” menu appears.
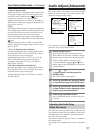
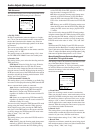
4
Use the and cursor buttons to select
“Listening Mode Preset” and then press
the ENTER button.
The “Listening Mode Preset” menu appears.
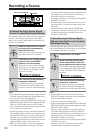
5
Use the and cursor buttons to select
an input source signals and then use the
and cursor buttons to set the
desired listening modes.
• If you set “Last Valid” as the listening mode
preset, the last listening mode used for the cur-
rent input source type will be used automati-
cally when the same input source type is
selected to output next time.
6
Press the SETUP button to return to the
main menu.
2-6.ListeningMode Preset
a.Analog/PCM
:Last Valid
b.PCM fs=96k :Last
c.Dolby D :Last Valid
d.DTS :Last Valid
e.D.F.2ch
:Last Valid
f.D.F.Mono:Last Valid
Quit:[SETUP]
Input:DVD