


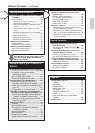


13
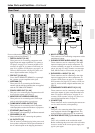
Index Parts and Facilities—Continued
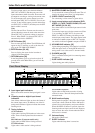
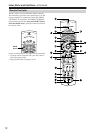
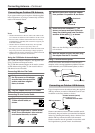
1 SEND/LEARN indicator [7]
Lights red when signals are sent by the remote con-
troller. It also flashes when a button is pressed and
the battery power is low.
2 ON/STANDBY button [27, 68]
ON: Press to turn on the TX-NR801/TX-NR801E.
STANDBY: Press to place the TX-NR801/
TX-NR801E in the standby state.
Be aware that pressing the STANDBY button only
places the TX-NR801/TX-NR801E in standby and
does not turn the power off completely.
3 SLEEP button [40]
Press to set the sleep function.
The SLEEP button enables you to set the
TX-NR801/TX-NR801E to turn off automatically
after a specified time period.
4 MACRO 1, 2 button [86, 88, 89]
Press to program or execute the macro function.
5 MODE buttons and indicators [80-88]
Press to select the component to be operated by the
remote controller. When a MODE button is pressed,
it will light for 8 seconds. The selected MODE but-
ton will also light whenever any other operation but-
ton is pressed.
6 RETURN button [29]
Press to enter the selected setting and return to the
previous menu.
7 CH button [46]
Press to select a preset channel for the tuner.
8 CH SEL button [35, 40, 65]
Press to select a speaker channel when adjusting the
speaker level.
9 AUDIO SEL button [41, 65]
Press to select the audio input signal.
0 LEVEL / buttons [35, 40, 65]
Press to adjust the volume of the speaker selected
using the CH SEL button.
A Operation buttons [80-81, 85]
Press to operate other devices connected to the
TX-NR801/TX-NR801E.
B INPUT SELECTOR buttons [36, 39, 44, 52,
56, 65, 68]
Press to select an input source.
Same as the input selector buttons on the front panel
of the TX-NR801/TX-NR801E. The input source
for each button is given here. DVD:DVD, CD:CD,
V1:VIDEO1, V2:VIDEO2, V3:VIDEO3,
V4:VIDEO4, V5:VIDEO5, TAP:TAPE, TUN:FM/
AM, PH:PHONO.
C Listening mode buttons [44, 65]
Press to select a listening mode.
D Re-EQ button [55, 61]
Depending on the listening mode, you can turn the
Re-EQ function on or off.
E DISPLAY button [41]
For changing the front display.
F DIMMER button [40]
Adjusts the display brightness.
There are three settings available: normal, dark, and
very dark.
G LIGHT button
Press to turn on and off the lights in the buttons of
the remote controller.
H SETUP button [29]
Press to display the Setup Menu on the TV screen
and in the display. Press again to exit the menu.
I ///, ENTER button [29]
When in the Setup Menu, press the upper and lower
arrow buttons to select an item, press the right and
left arrow buttons to select parameter values or
modes, and press the ENTER button to advance to
the next item.
J VOL button [39, 65]
Press to adjust the volume.
K TEST button [35]
This button is used to set the speaker output levels.
Use this button in conjunction with the LEVEL /
and CH SEL buttons to calibrate the speaker lev-
els without entering the Setup Menu.
L MUTING button [39]
Press to activate the mute function.
M ZONE 2 button [68]
Press to perform operations in the remote zone.