


57
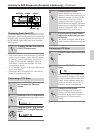
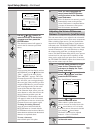
Input Setup (Advanced)—Continued
c. Dolby D (Dolby Digital)
Digital data with AC-3 compression and a maximum of
5.1 channel surround sound. This source signal comes
from DVDs and LDs that have the mark and
therefore are recorded for 5.1 channel output.
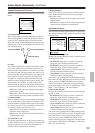
Available listening modes for “Dolby D” are Dolby D,
THX, Enhance, Orchestra, Unplugged, Studio-Mix, TV
Logic, Stereo, and T-D.
d. DTS
DTS (Digital Theater System) is compressed digital data
with a maximum 5.1 channel surround output (6.1 chan-
nel with DTS-ES Discrete sources) that allows for an
extremely high-quality sound. This source signal
requires a DVD player that supports DTS output and
comes from DVDs, compact discs, and LDs that have the
mark.
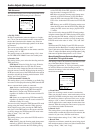
Available listening modes for “DTS” are DTS, THX,
Enhance, Orchestra, Unplugged, Studio-Mix, TV Logic,
Stereo, and T-D.
e. D.F. 2 ch (Digital Format 2 channel)
2 channel digital signals (not including PCM) such as
Dolby Digital. DVDs or LDs recorded with 2 channel
sound may be this type of input signal.
Available listening modes for “D.F. 2 ch” are PL II/
Neo:6, THX, Mono Movie, Enhance, Orchestra,
Unplugged, Studio-Mix, TV Logic, All Ch Stereo,
Mono, Stereo, and T-D.
f. D.F. Mono (Digital Format Monaural)
Monaural digital signals (not including PCM) such as
Dolby Digital. DVDs or LDs recorded with monaural
sound may be this type of input signal.
Available listening modes for “D.F. Mono” are Mono
and Mono Movie.
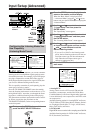
Audio Adjust (Advanced)
The “Audio Adjust” menu allows you to specify detailed
settings for the audio signal. This section explains the
advanced settings for audio effects.
If you want to perform these operations using the remote
controller, first press the RCVR button.
This sub-menu gives you various ways to adjust the tim-
ing of the audio output from the speakers to give certain
soundfield effects or to adjust for unwanted asynchro-
nous video and audio tracks.
This sub-menu does not appear if “Direct” is selected as
the listening mode.
This setting is not available when you select “Multichan-
nel.”
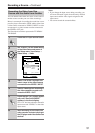
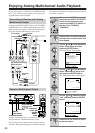
1
Display the main menu.
Press the SETUP button on the front panel or
SETUP button on the remote controller to display
the main menu on the monitor and front display.
When the “Basic Menu” is displayed, select
“→Advanced Menu” using the and cursor
buttons and press the ENTER button to display the
“Advanced Menu.”
2
Use the and cursor buttons to select
“3. Audio Adjust” and then press the
ENTER button.
The “Audio Adjust” menu appears.
3
Use the and cursor buttons to select
an item and then press the ENTER button.
4
Use the and cursor buttons to select
an item and then use the and cursor
buttons to set the desired value.
5
Press the SETUP button to exit.
Press the RETURN button to return to the previ-
ous menu.
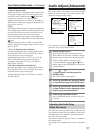
Adjusting the Audio Delay
(Delay Sub-menu)
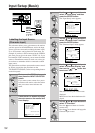
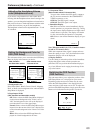
3.Audio Adjust
9.THX
10.Mono Movie
11.Enhance
12.Orchestra
13.Unplugged
14.Studio-Mix
15.TV Logic
→
default
3.Audio Adjust
1.Tone Control
2.Surround Speakers
3.Sound Effect
4.Delay
5.LFE Level
6.Mono
7.Theater-Dimensional
8.Surround
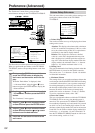
Advanced Menu
0.Hardware Setup
1.Speaker Setup
2.Input Setup
3.Audio Adjust
4.Preference
5.Network Setup
[ENTER]Quit:[SETUP]
→
Basic Menu