


Other connections
10
88
En
• Windows
®
98SE – Select Multimedia, and then
select Audio. Choose PIONEER AV Receiver/
Amplifier from the drop down menu.
• Windows
®
Me/Windows
®
2000 – Select Sound
and Multimedia and then select Audio. Choose
PIONEER AV Receiver/Amplifier from the drop
down menu.
You will also need to make sure the correct speaker
setting is selected with the audio software you’re using.
Please refer to the manual that came with the software to
make these settings.
6 Turn up the volume control on your computer
and this receiver.
You may want to start with a fairly low volume on this
receiver and turn it up as necessary after you’ve checked
your levels.
7 Start playback of a source on your computer.
8 If necessary, press SIGNAL SELECT to choose the
number of channels you’ll hear.
See Selecting USB and multichannel analog input
channels on page 49 for more on this.
Note
• Windows
®
XP, Windows
®
2000, Windows
®
Millennium Edition and Windows
®
98 Second
Edition operating systems have been tested for
compatibility with this interface, but depending on
your computer setup, you may find that your system
is not compatible.
• This USB interface supports up to 8 channels of
audio.
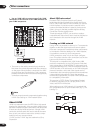
• Make sure you use a USB cable that connects from
an A-type connector (from your PC) to a 4-pin B-type
connector (to the receiver).
• The USB specification is version 1.1 compatible, and
the USB Audio Class specification is 1.0 compatible.
• You won’t be able to control this receiver using your
computer (and vice-versa).
• Sampling formats up to 48kHz can be heard using
the USB connection (formats above 48kHz sampling
must be downsampled).
• Any computer alert sounds will also be heard
through the speakers unless you switch them off
from the computer’s control panel.
• You won’t be able to hear the audio from the USB
connection through the digital outputs of this
receiver.
• Even when the receiver is switched off, it will remain
selected in your speaker settings.
• Note that using hubs or extensions may cause
connection problems.
Caution
• Make sure you don’t switch off the computer or
unplug the USB cable during playback.
• To prevent noise being output, don’t use other
software on your computer during playback.
• Pioneer is not responsible for computer system
damage, software crashes or failures, or any other
possible computer problems due to this
configuration.
Microsoft Windows
®
XP, Windows
®
2000, Windows
®
Millennium Edition and Windows
®
98 Second Edition are
registered trademarks of Microsoft Corporation, Inc.
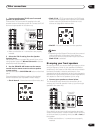
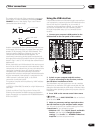
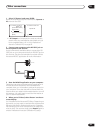
Connecting a PC for Advanced
MCACC output
If you used the Professional Acoustic Calibration EQ on
page 63 to measure the reverb characteristics of your
listening room, you’ll be able to connect a computer
using the RS-232C jack on the back panel to check the
results graphically. Use a commercially-available RS-
232C cable to connect the RS-232C jack on your
computer to the 9-pin RS-232C jack on this receiver (the
cable must be cross type, female–female).
To obtain the software to output the results, please
register this unit online as instructed on the front cover
of the manual. After registering, you will be able to
access the download area from the Pioneer website,
where both the software and instruction manual will be
available. If you have any questions regarding, please
contact the Customer Support Division of Pioneer.
Please make sure your system meets the following
requirements:
• Operating system must be Windows
®
XP, Windows
®
2000, Windows
®
Millennium Edition, Windows
®
98
Second Edition, or Windows
®
NT 4.0 (Service pack 6).
• CPU must be at least Pentium 3 / 300MHz or AMD K6
/ 300MHz (or equivalent) with at least 128MB of
memory, and your monitor must be able to display a
minimum resolution of 800x600.
• An RS-232C port connector is necessary for
graphical output. Refer to the operating instructions
and/or the PC manufacturer for more information on
making the proper port settings.
• System must have internet access.
Before doing these steps, make sure you complete steps
1–6 in Using Professional Acoustic Calibration EQ on
page 64.