


The Surround Setup menu
07
62
En
Setting the Acoustic Calibration EQ manually
Before manually adjusting the Acoustic Calibration EQ,
we recommend copying the ALL CH ADJ or the FRONT
CH ALIGN settings from the Auto setup above (or from
Introduction to home theater on page 39) to one of the
custom settings. Instead of just a flat EQ curve, this will
give you a reference point from which to start (see
Copying your Acoustic Calibration EQ settings below for
how to do this).
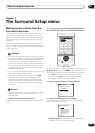
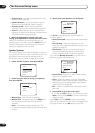
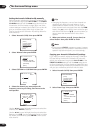
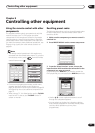
1 Select ‘Acoustic Cal EQ’ then press ENTER.
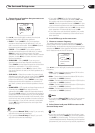
2 Select ‘Manual’ then press ENTER.
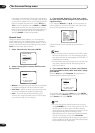
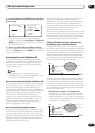
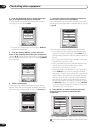
3 Select CUSTOM1 or CUSTOM2 then press ENTER.
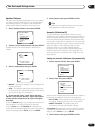
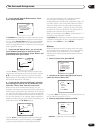
4 Select the channel you want, adjust the
frequency curve to your liking, then move to the
next speaker.
Use the / (cursor left/right) hard keys to select the
channel, then ENTER to select it.
Use the / (cursor left/right) hard keys to select the
frequency and / (cursor up/down) to boost or cut the
EQ. When you’re finished, press ENTER to move to the
next channel.
Tip
• Changing the frequency curve of one channel too
drastically will affect the overall balance. If the
speaker balance seems uneven, you can raise or
lower channel levels using test tones with the TRIM
feature. Use (cursor right) to move to the far right
side of the OSD, then use / (cursor up/down) to
raise or lower the channel level for the current
speaker.
5 When you’re done, press (cursor down) to
select ‘Return’ then press ENTER to finish.
Note
• If the message OVER !! appears on-screen, it means
the frequency curve may result in distortion from the
speaker. Adjust the frequency curve accordingly.
Copying your Acoustic Calibration EQ settings
If you want to manually adjust the Acoustic Calibration
EQ (see Setting the Acoustic Calibration EQ manually
above), we recommend copying the ALL CH ADJ or the
FRONT CH ALIGN settings from the Auto setup above
(or from Introduction to home theater on page 39) to one
of the custom settings. Instead of just a flat EQ curve, this
will give you a reference point from which to start.
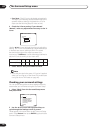
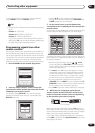
1 Select ‘Acoustic Cal EQ’ then press ENTER.
2 Select ‘Data Copy’ then press ENTER.
2.Surround Setup
[ Check ]
[ 1.Speaker Systems ]
[ 2.Channel Level ]
[ 3.Speaker Distance ]
[ 4.Acoustic Cal EQ ]
[ 5.X-Curve ]
[Return]
2. 4. Acoustic Cal EQ
[Data Copy]
[Manual]
CUSTOM1 , CUSTOM2
[Auto]
ALL ADJ & FRONT ALIGN
[Professional]
[Return]
2.4. Acoustic Cal EQ
[ CUSTOM1 ]
A[ CUSTOM2 ]
[Return]
Manual
63
125
250
500
1k
2k
4k
8k
16k
TRIM
2.4. Acoustic Cal EQ
Manual
Target Curve : CUSTOM1
Channel [L•SMALL]
[Return]
2.Surround Setup
[ Check ]
[ 1.Speaker Systems ]
[ 2.Channel Level ]
[ 3.Speaker Distance ]
[ 4.Acoustic Cal EQ ]
[ 5.X-Curve ]
[Return]
2. 4. Acoustic Cal EQ
[Data Copy]
[Manual]
CUSTOM1 , CUSTOM2
[Auto]
ALL ADJ & FRONT ALIGN
[Professional]
[Return]