E-0
Demonstration mode■
The rst time the unit is plugged in, the unit will enter the
demonstration mode.
To cancel the demonstration mode, press the RETURN/DEMO
button (remote control) during power stand-by mode. The unit will
enter the low power consumption mode.
To return to the demonstration mode, press the RETURN/DEMO
button again.
If iPod or iPhone is docked, the unit will begin charging. “Charge Mode”
will be displayed. Demonstration mode is invalid during charge mode.
Connecting iPod or iPhone to TV■
Photo and video les from iPod or iPhone can be viewed by connecting
the system to TV/monitor.
If the TV/monitor has a video input, connect it to the iPod VIDEO OUT
socket at the back of the unit and set the TV Out on the iPod or
iPhone unit to “ON” position. (Refer page 36.)
Note:
Please make sure to set iPod unit to either NTSC or PAL to match your
TV signal. Please visit Apple’s homepage for further information.
AC power connection■
After checking all the connections have been made correctly, plug the
AC power lead of this unit into the wall socket.
Note:
Unplug the AC power lead from the wall socket if the unit will not be
in use for a prolonged period of time.
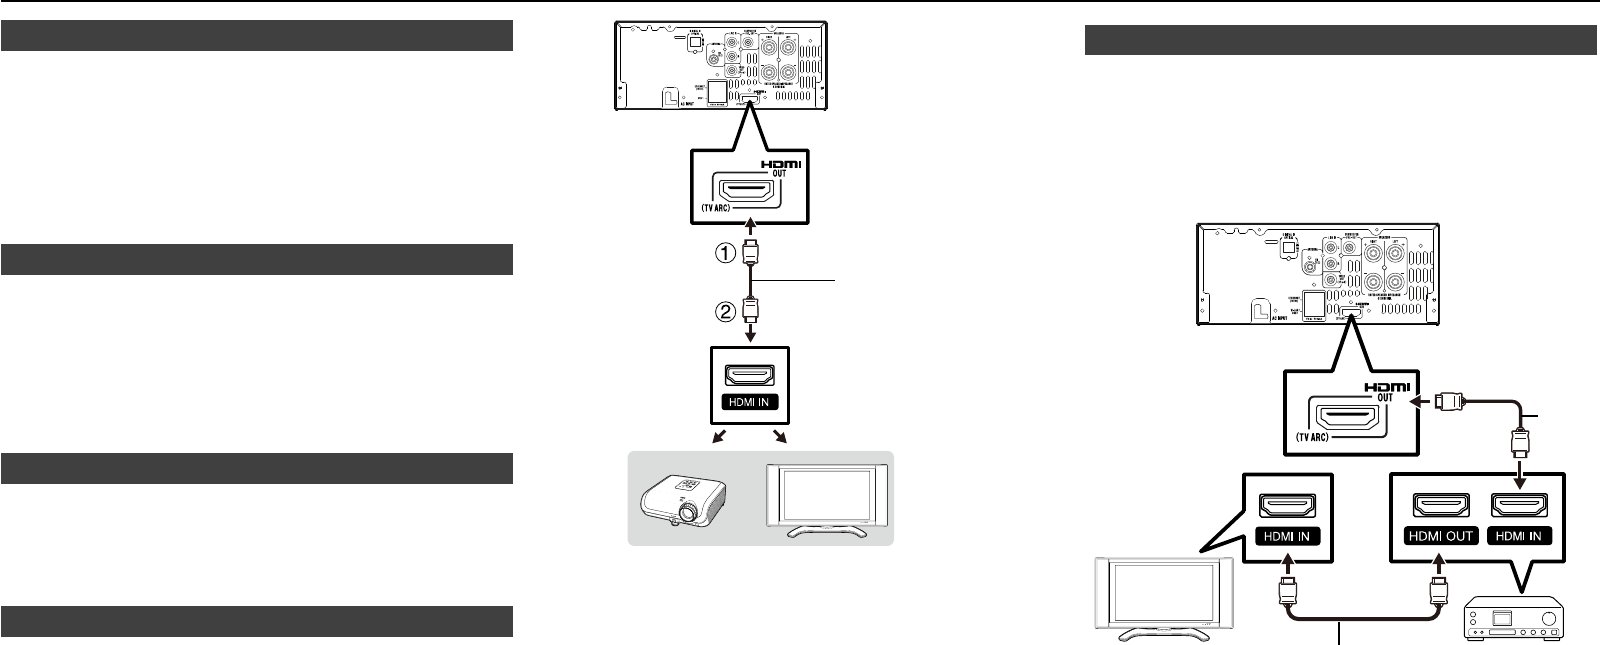
HDMI connection (TV, projector)■
You can enjoy high quality digital picture and sound using an HDMI cable.
(Only TVs/projectors with an HDMI terminal can be connected to this unit.)
When using HDMI ARC (Audio Return Channel) Connection
When this unit is connected to TV, there might be a necessity to
adjust the TV menu.
Refer the operation manual of the respective TV, concerning ARC.
In case of incompatibility between this unit and your TV HDMI ARC,
please use the analog or digital connection. (Refer Line In and Digital
In connection on page 11.)
When you use AQUOS LINK or TV ARC, make sure to use a certied
HDMI cable.
Be sure to turn off this Unit and the TV/projector before making
any connections.
Firmly connect an HDMI cable to the HDMI OUT (TV ARC) terminal
on this unit (1) and the HDMI IN terminal of the TV/projector (2).
●
●
●
●
�
2�
HDMI cable
(supplied)
Projector TV
To TV HDMI (ARC) input
terminal
Notes:
In this unit, “HDMI Video Out” is set to “Auto” as a default (See
page 27). (Normally set to “Auto”.) If you don’t get a stable image
with “HDMI Video Out” set to “Auto”, select the output resolution
which corresponds to the connected equipment.
This unit supports HDMI which enables ARC (Audio Return Channel).
To enable ARC make sure to use High Speed HDMI cable.
This structure also needs TV that supports ARC.
To enjoy 3D images, connection to a 3D compatible TV is needed.
For connection to a TV/projector, refer to the TV/projector’s
operation manual.
After connecting
If necessary, perform the Audio Video Settings. (Page 27)
Refer to AQUOS LINK function. (Pages 16 and 28)
Prepare the desired disc or content and start playback. (Pages
18–23, 24-25)
●
●
●
●
●
●
●
●
●
Connecting to an amplier/AV receiver■
You can connect this unit to an amplier/AV receiver to enjoy digital
surround sound. With this unit, the audio connection can be made
using HDMI connection depending on the capabilities of the amplier/
AV receiver you connect.
Note:
Be sure to turn off this Unit and the equipment before making any
connections.
For details on output of audio formats, see page 34.
HDMI cable
HDMI
cable
TV Amplier/
AV receiver
Notes:
When using an HDMI output, 7.1 ch Digital Output is available.
Audio transmitted in DTS-HD High Resolution Audio and DTS-HD
Master Audio formats is output from the HDMI terminal as Bitstream.
Connect an amplier with a built-in decoder to enjoy the ne sound
quality.
When a connection to a 3D TV is made via an amplier/AV receiver, it
is necessary to connect to a 3D compatible amplier/AV receiver.
●
●
●
●
●
System connections (continued)


