


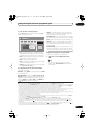
Using the digital electronic programme guide
05
87
En
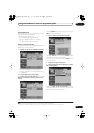
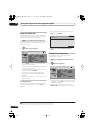
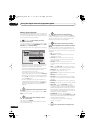
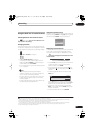
3 Enter the timer recording settings.
Use the
/
buttons to select a field; use the
/
buttons to change the value
1
.
•
CH
– Choose a channel (Pr 1 to Pr 99 for analog
channels and available digital channels (excluding
skip channels)) or an external input to record from.
•
Date
– Choose a date up to one month in advance, or
select a daily or weekly programme.
•
Start
– Set the recording start time.
•
Stop
– Set the recording end time (maximum length
of a timer recording is 24 hours).
•
Extend
– Extend the end time of the timer recording
(select
Off
,
10
,
20
or
30
mins.).
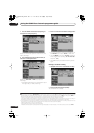
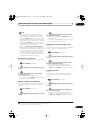
4 If you want to change the recording mode,
recording destination, etc., select ‘Set Detailed’.
In this area you can set:
Record to
– Select
HDD
for hard disk recording or
DVD
for DVD recording
2
.
Recording Mode
– Select from
AUTO
3
,
XP
,
SP
,
LP
,
EP
,
SLP
,
SEP
(see
Setting the picture quality/recording time
on
page 95). If Manual Recording is on, then you can also
select the
LPCM
setting,
XP+
or
MN
(press
ENTER
then
use the
/
buttons to select the level).
VPS/PDC
4
– Choose whether or not to use VPS/PDC
when making timer recordings of analog programmes
(see
About timer recordings
on page 98).
Auto Replace Rec.
– Automatically erases the previous
daily or weekly recording when the next one is recorded.
Genre
– Select a record genre (for HDD recording only).
EPG Link
5
(UK only)
– Choose whether or not to have this
device automatically record scheduled programmes
from the Digital EPG even if the times in which they are
broadcast change.
Series Recording
6
(UK only)
– Choose whether or not to
record all programmes from a series when you make a
recording from the Digital EPG (for HDD recordings only).
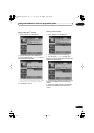
5 After entering all the timer recording information,
highlight ‘Store Programme’ and press
ENTER
.
A red clock icon appears for the programme.
6 Press to exit the Digital EPG screen.
Tip
• To enter a title name for the timer recording in
advance, select
Set Title Name
and follow the on-
screen display.
Note
1 You cannot change the
CH
,
Date
,
Start
,
Stop
,
Extend
and title name when you have
EPG Link
set to
On
(see below).
2• For a DVD timer recording, if
Optimized Rec
(see
Optimized Rec
on page 157) is set to
On
(and VPS/PDC is off), the recorder will adjust the
recording quality to try and fit the recording on the disc. If the recording will not fit onto the disc even on
MN1
recording quality (
MN4
for
DVD+R/+RW) then the Recovery Recording feature will automatically make the recording to the HDD instead.
• If there is very little free space left on the HDD, an Auto Replace Recording may not complete successfully.
• If the HDD is being used for playback or high-speed copying when an Auto Replace Recording is due to start, the new timer recording will
not replace the old one. However, the next time the timer recording starts, both of the older two programmes will be erased.
3 This mode maximizes the recording quality to fit on to a single DVD disc. Can also be used when recording to HDD.
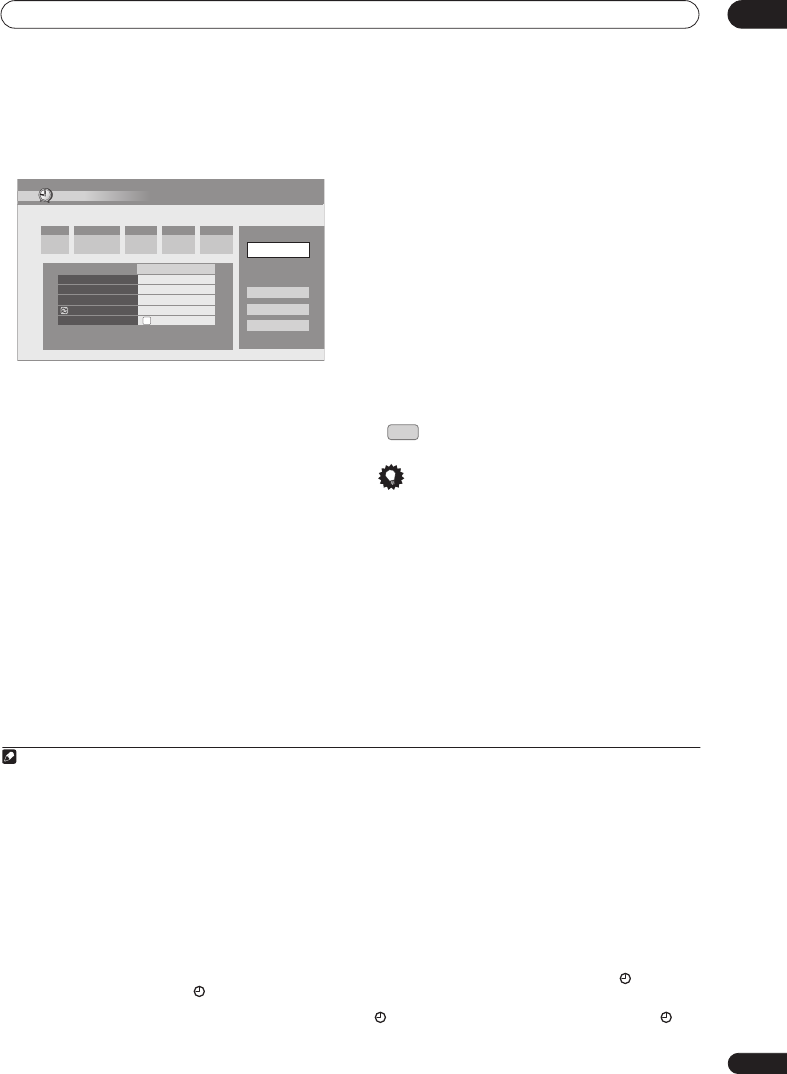
Timer Programme Set
Manhattan Open Tennis
CH Date Start Stop Extend
D.TV003
SUN 1/4 18:00 19:00 Off
Enter Details
Detailed Settings
Record To HDD
Recording Mode XP
VPS/PDC ------
Auto Replace Rec. ------
Genre No Category
Store Programme
Cancel
Set Title Name
Set Detailed
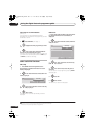
VPS/PDC 0/8
4• If you set the timer recording to use VPS/PDC, you must switch the recorder into standby before the timer recording is due to start for it to
work correctly. For non-VPS/PDC timer recordings there is no need to switch the recorder into standby.
• Optimized Recording will not work if VPS/PDC is on.
• Up to eight timer recordings can be set with VPS/PDC.
• VPS/PDC cannot be set for recordings made from digital broadcasts or an external input, or when the recording mode is set to
AUTO
.
5• You cannot set an
EPG Link
when recording mode is set to
AUTO
.
• You cannot change the
CH
,
Date
,
Start
,
Stop
,
Extend
and title name when you have
EPG Link
set to
On
.
• When you have
EPG Link
set to
On
and you set a timer recording for a programme that is divided into multiple parts, all parts of that
programme are recorded automatically. In the programme list, the earliest part of the programme to be recorded has a red
icon, with
successive parts indicated by a gray icon. Data provided by the broadcaster determines which programmes are classified as divided
programmes.
6• In the programme list, the earliest programme to be recorded has a red icon, with successive programmes indicated by a gray icon.
• There is a limit to the number of programmes you can schedule to record with the Series Recording function.
• Data provided by the broadcaster determines which programmes are classified as part of a series.
GUIDE
02SDVRLX70D_EN.book 87 ページ 2007年7月18日 水曜日 午前10時9分