


Connecting up
02
13
En
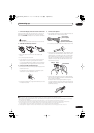
Caution
• These speaker terminals carry
HAZARDOUS LIVE
voltage
. To prevent the risk of electric shock when
connecting or disconnecting the speaker cables,
disconnect the power cord before touching any
uninsulated parts.
• Do not connect any speakers other than those
supplied to this system.
• Do not connect the supplied speakers to any
amplifier other than the one supplied with this
system. Connection to any other amplifier may result
in malfunction or fire.
• After connecting the plugs, pull lightly on the cables
to make sure that the ends of the cables are securely
connected to the terminals. Poor connections can
create noise and interruptions in the sound.
• If the cables’ wires happen to be pushed out of the
terminals, allowing the wires to come into contact
with each other, it places an excessive additional load
on the amp. This may cause the amp to stop
functioning, and may even damage the amp.
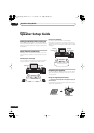
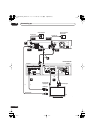
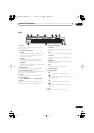
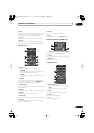
5 Connect the HDD/DVD recorder to the receiver
subwoofer.
a. Plug the control cable into the
CONTROL OUT 1
jack
on the side of the receiver subwoofer.
Plug the other end of the cable into the
CONTROL IN
jack on the rear of the HDD/DVD recorder.
b.Plug the HDMI cable into the
HDMI IN 1
jack on the
rear of the receiver subwoofer.
Plug the other end of the cable into the
HDMI OUT
jack on the rear of the HDD/DVD recorder.
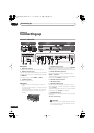
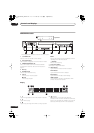
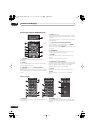
6 Connect the receiver subwoofer to your TV.
• Connect the
HDMI OUT
jack on receiver subwoofer
to an HDMI input on your TV.
• You can have audio from the receiver subwoofer, as
well as audio and video from the HDD/DVD recorder,
output to your TV by connecting with a single HDMI
cable.
7 Connect an audio cable from your TV to the
receiver subwoofer.
• To listen to TV audio on this unit, you must connect
the TV’s audio output to an audio input jack on this
unit. You can connect by either a digital (optical) or
analog audio cable. For digital audio, connect to
DIGITAL OPTICAL IN 1
on the receiver subwoofer.
To use the HDMI Control function when you are
connected to a supported Pioneer plasma television,
you must connect via HDMI.
• You must first set ‘
TV Input
’ to switch the audio from
a plasma television with the HDMI Control function
or to switch the input source of this unit to TV audio
and operate your TV with the supplied remote control.
For more information, see
Operating Pioneer plasma
televisions and TVs
on page 22 and
Audio input
settings from Plasma televisions (TV Input)
on
page 46.
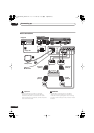
8 Connect a TV antenna.
• Connect the TV antenna from your TV to the
HDD/DVD recorder. See
Connecting a TV antenna
on
page 62 to connect the antenna.
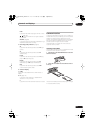
9 Connect the power cord.
1
• Connect each power cord to the AC inlet on the HDD/
DVD recorder and the receiver subwoofer. Connect
each power cord to a wall socket in the following
order: 1. HDD/DVD recorder 2. Receiver subwoofer 3.
TV.
• Run the cords that are connected to the side panel of
the receiver subwoofer over the back side of the unit,
and replace the cover on the side panel.
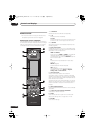
Note that unless the control cable is connected,
you
can’t use the remote control with the HDD/DVD recorder.
Note
1• Do not use any power cord other than the one supplied with this system.
• Do not use the supplied power cord for any purpose other than connecting to this system.
• After connecting this unit to an AC outlet, a 15-second initialization process begins. You cannot carry out any operations during initialization.
The HDMI indicator on the display unit blinks during initialization, and you can turn this unit on once it has stopped blinking.
01SX-SW70SW_EN.book 13 ページ 2007年7月17日 火曜日 午後8時28分