Recorder connections
02
65
En
Connecting an external decoder box (2)
If you only have a decoder, connect it to this recorder and
your TV as shown on this page.
1
Using the setup on this page you can:
• Record scrambled channels received using the
recorder’s built-in analog TV tuner.
Important
• Do not connect this recorder ‘through’ your VCR,
satellite receiver or cable box. Always connect each
component directly to your TV or other AV
component.
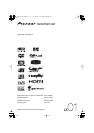
1 Connect your TV antenna to the recorder and TV.
See
Connecting a TV antenna
on page 62 for details.
2 Use a SCART cable (not supplied) to connect the
AV1 (RGB)-TV AV connector to a SCART AV connector
on your TV.
This enables you to watch discs.
3 Use another SCART cable to connect the AV2
(INPUT 1/DECODER) AV connector to a SCART AV
connector on your decoder box.
This enables you to record scrambled TV channels.
Connecting using HDMI
Connect the receiver subwoofer to this recorder using
the supplied HDMI cable (see page 13 for details).
The HDMI connector outputs uncompressed digital
video, as well as almost every kind of digital audio.
When connected to an HDMI component or HDCP-
compatible DVI component, the HDMI indicator lights.
HDMI setup is generally automatic. There are however
settings you can change if you need to. See
HDMI Output
(only available when an HDMI device is connected)
on
page 159 for more information. Note that the HDMI
settings remain in effect until you change them, or
connect a new HDMI component.
Important
• An HDMI connection can only be made with DVI-
equipped components compatible with both DVI and
High-bandwidth Digital Content Protection (HDCP).
If you choose to connect to a DVI connector, you will
need a DVI to HDMI adaptor cable. A DVI to HDCP
connection, however, does not support audio.
Consult your local audio dealer for more information.
• The HDMI connection is compatible with 32 kHz,
44.1 kHz, 48 kHz, 96 kHz, 16 bit/20 bit/24 bit 2-channel
linear PCM signals, as well as Dolby Digital, DTS and
MPEG audio bitstream.
• If your connected component is only compatible with
Linear PCM, the signal is output as Linear PCM (DTS
audio is not output).
• If you have connected to a Pioneer plasma television,
please select the HDMI setup on the display (refer to
the supplied manual for more on this).
About HDMI
HDMI (High-Definition Multimedia Interface) supports
both video and audio on a single digital connection for
use with DVD players and recorders, DTV, set-top boxes,
and other AV devices. HDMI was developed to provide the
technologies of High-bandwidth Digital Content Protec-
tion (HDCP) as well as Digital Visual Interface (DVI) in
one specification. HDCP is used to protect digital content
transmitted and received by DVI-compliant displays.
HDMI has the capability to support standard, enhanced,
or high-definition video plus standard to multi-channel
surround-sound audio. HDMI features include
uncompressed digital video, a bandwidth of up to five
gigabits per second (Dual Link), one connector (instead
of several cables and connectors), and communication
between the AV source and AV devices such as DTVs.
Note
1 In order to use this setup, you will need to make the following settings from the Initial Setup menu:
• Set the
AV2/L1 In
setting to
Decoder
from the Initial Setup menu (see
AV2/L1 In
on page 155).
• From the
Manual CH Setting
screen, set the
Decoder
setting for the scrambled channels to
On
(see
Manual CH Setting
on page 154).
AC IN
DIGITAL
AUDIO OUT
COAXIAL
HDMI OUT
ANTENNA(DIGITAL)
IN
OUT
5 V
30 mA
CONTROL
G-LINK
IN
AV 1 (RGB) – TV
AV 2 (INPUT 1/DECODER)
ANTENNA
IN
OUT
TV
Decoder
2
3
From SCART AV
connector
To SCART AV
connector
AV2 (INPUT 1/
DECODER)
AV1 (RGB) - TV
02SDVRLX70D_EN.book 65 ページ 2007年7月18日 水曜日 午前10時9分