


27
Note: If there is a Disc playing in the MVP871 press
the STOP Push-button twice before pressing the
SETUP Push-button.
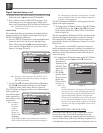
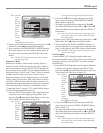
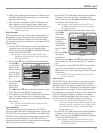
2. Use the Down directional Push-button on the Re-
mote Control to select the COMPONENT VIDEO
OUT Menu.
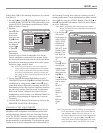
Refer to
figure 30.
CAUTION: DO NOT use the MVP871 DVD Player’s
Progressive Video Display Mode unless you
are certain the TV/Monitor connected to the
MVP871’s Componet Video Output jacks is
capable of displaying a Progressive Scan
Signal. Failure to do so could result in pos-
sible damage to the TV/Monitor. If you are
not sure about the capability of the TV/Moni-
tor connected to the MVP871 Component
Video Output, refer to the Owner’s Manual
supplied with the set and/or contact your
McIntosh Dealer for assistance. In order
to switch the MVP871 Component Video
Output to the Interlace Mode (non Progres-
sive Scan), the MVP871 will first have to be
connected to a TV/Monitor having either
Progressive Scan capability or can except
either S-Video or Composite Video Signals.
3. To change from the default setting use the Right
directional Push-button followed by Up or Down
directional Push-buttons and then press the SELECT
Push-button.
Note: The title of the icon button-bar will change color
from yellow (the cursor color) to blue indicating
the selected item. Not all High definition TV/Moni-
tor sets are fully compatible with the MVP871 and
may cause artifacts to be displayed in the picture.
In the case of Progressive Scan picture problems,
it is recommened to switch off the Progressive
Scan feature in the MVP871 and instead use the
built-in Progressive Scan feature of the TV/moni-
tor. For additional information please contact your
McIntosh Dealer.
SETUP, con’t
press the Right directional Push-button to select the
Video Menu Icon Tab. Refer to figure 24.
Note: If there is a Disc playing in the MVP871 press
the STOP Push-button twice before pressing the
SETUP Push-button.
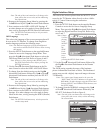
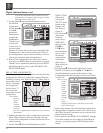
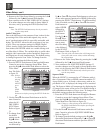
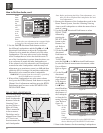
2. Use the Down directional Push-button on the Re-
mote Control to select the TV TYPE Menu. Refer to
figure 29.
3. To change from
the default
setting use the
Right direc-
tional Push-
button fol-
lowed by Up
or Down
directional
Push-buttons
and then press
the SELECT
Push-button.
Note: The title of the icon button-bar will change color
from yellow (the cursor color) to blue indicating
the selected item.
4. Return to the Video Setup Menu by pressing the Left
followed by the Up directional Push-buttons.
5. Next continue to the COMPONENT VIDEO OUT
Settings. If no other changes are to be made in Setup
Mode at this time, exit by pressing the RTRN (Return)
Push-button.
Note: The SETUP Push-button may also be pressed to
exit the setup mode.
Component Video Out
This selects the video signal format available at the Com-
ponent Video Jacks to match the capabilities of the con-
nected TV/Monitor. To change from the default setting of
Progressive perform the following steps:
Note: The Progressive Scan Circuitry in the MVP871 of-
fers the highest possible analog video picture quality
available when the Component Video Outputs of the
MVP871 are connected to a TV/Monitor capable of
Progressive Scan. Unlike a conventional TV with Odd
and Even Scanning Lines that are interlaced together
to form a picture, the Progressive Scanning Mode
scans all the lines of picture information both Odd
and Even at one time, non-interlaced.
1. Press the SETUP Push-button on the Remote Control
to access the Language Setup Menu. Then press the
Right directional Push-button to select the Video
Setup Menu Icon Tab. Refer to figure 24.
Figure 29
Figure 30