iCOM
Controls Training and Service Manual
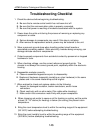
Troubleshooting Checklist
1. Check the obvious before beginning troubleshooting.
A. Be sure that a remote control switch has not been shut off.
B. Be sure that the communication cable is properly connected.
C. Be sure that power is reaching all modules associated with the system.
2. Power down the entire unit during the process of removing or replacing any
component or cable.
A. Serious damage to components may result if this step is not taken.
B. After removal or replacement actions, power may be restored to the unit.
3. Wear a personal ground strap when handling printed circuit boards or
associated connecting cables. Static electricity, besides being annoying, can
damage delicate electronic components.
4. Protect exposed components from accidental contact by personnel or dropped
hardware or tools.
5. When checking voltage, use the correct reference (ground) points. The
chassis is not always the correct ground point, especially within the electronic
housing.
6. Reassemble modules correctly.
A. Observe assembled appearance prior to disassembly.
B. Replace all hardware (especially insulating or nylon hardware) in the same
places and in the same relationship as the original.
7. When advised to check and replace cables, do the following:
A. Inspect for damaged insulation, broken conductors, and/or loose
connectors.
B. Check continuity with an ohm meter (Flex cable while checking.).
C. Make certain that connectors mate firmly with proper receptacles.
8. When changing set points to cause a call for heating or cooling, set the points
at least 10°-15° above (for heating) or below (for cooling) the present room
temperature.
9. Bring the room temperature level to within the working range of the equipment
(35°-90°F) before attempting troubleshooting.
10. Bring the room humidity level to within the working range of the equipment
(35%-65%) before attempting troubleshooting.
146


