


AGILENT 35670A
Supplemental Operator’s Guide
26
• Toggle the [XDCR UNIT ON OFF] softkey (F4) until ON is highlighted.
• Press the [XDCR UNIT LABEL] softkey (F7).
• Select the [g] softkey (F2).
Setting Up Input Range
Use CH* AUTO UP ONLY as the autorange routine as follows:
• Press the [Input] hardkey.
• Press [ALL CHANNELS] softkey (F2).
• Select the [CH* AUTO UP ONLY] softkey (F5).
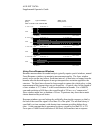
Then tap the structure with the hammer once. A yellow overload light by the input
BNC connectors will indicate an overload, and the range will increase one step.
Continue tapping on the structure, one tap at a time, allowing time for the input range
to increase, until an overload is no longer indicated. This may take many hammer
strikes. When an overload on either channel is no longer indicated, then the ranges
are set correctly.
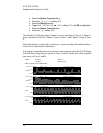
Choosing a Preliminary Frequency Span
Setting up a frequency response measurement is an interative process. A span is
selected, a measurement is made, and the results are examined to determine if a
narrower or wider span is required. To start measuring frequency response, you
must select an initial span:
• Press the [Freq] hardkey.
• Enter 1600 and then press the [Hz] softkey (F2).
Note: span should be any frequency that encompasses all modes of interest. If in
doubt, start with a wider span.
Specifying Trigger Parameters
Hammer testing is triggered by the signal from the hammer. Without a force
transducer, the trigger must come from the accelerometer that is attached to the
hammer and connected to Channel 1. To set up a Channel 1 trigger, follow these
steps:
• Press the [Trigger] hardkey.
• Press the [CHANNEL 1 234] softkey (F3) until 1 is highlighted.
• Press the [TRIGGER SETUP] softkey (F6)
• Press the [CHANNEL LEVEL] softkey (F1)
• Enter 5 then press the [PERCENT (%)] softkey (F4)
• Press the [SLOPE POS NEG] softkey (F5) until POS is highlighted.
• Press the [Trigger] hardkey.