56
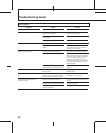
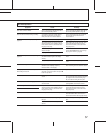
Symptom
The tape is ejected after being loaded.
The tape does not move.
The sound is not heard.
Recording cannot be made.
The 0OPEN/CLOSE does not function.
The sound is not heard from the recorded
tape.
The CAUTION indicator lights, and no
button does function.
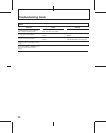
Troubleshooting Guide
Cause
The cassette is inserted incorrectly.
For 4 seconds after the power is turned on,
the buttons do not function.
The 8PAUSE button is activated. (The 8
indicator lights.)
The tape is wound completely.
Incorrect connections.
Incorrect operation of the connected
amplifier.
The safety tab of the cassette is open.
Incorrect position of the INPUT selector.
The digital copy prohibit signal exists in the
source signal input to the digital input jack.
The 0OPEN/CLOSE does not function
during recording.
When recording analog input signals, the
recording level is turned down completely.
(When recording the analog input signal)
Moisture condenses inside the unit.
Defective or damaged cassette is inserted.
The cassette is removed forcibly from the
cassette compartment.
Remedy
Insert the cassette correctly. (page 18)
Wait until the blinking of the 8 indicator
goes off and then try again.
Press the 8PAUSE button to release pause.
Press the 1 or 4 button to rewind.
Connect properly. (pages 15 to 17)
Operate the amplifier as required by the
deck operation. (Refer to the operating
instructions of the amplifier.)
Close the tab of the cassette. (page 18)
Set the INPUT selector correctly.
When recording sound from the equipment
connected to the COAXIAL IN or OPTICAL
IN jack, set the INPUT selector to the
COAXIAL or OPT position respectively.
When recording sound from the equipment
connected to the LINE IN jacks, set to the
ANALOG position.
Connect the source equipment to the LINE
IN jacks.
Press 7 to stop recording and then press
0OPEN/CLOSE.
Adjust the recording level by using the
REC LEVEL control. (page 23)
Leave the unit turned on for about an hour.
(page 4)
Remove the cassette.
Turn off the unit and then turn on again.
Basic Operation


