


90
GB
Picture
There is no picture.
• Press FUNCTION repeatedly until “DVD” or
“VIDEO” appears.
• Check that the system is connected securely.
• The SCART cord is damaged. Replace it with a
new one.
• Make sure you connect the system to the input
jack of your TV (page 10).
• Make sure you turn on the TV and operate the TV
correctly.
• Make sure you select the video input on the TV so
that you can view the pictures from the system.
Picture noise appears.
• Try moving the system to a place without
vibration.
• Clean the disc.
• If video from your DVD player has to go through
your VCR to get to your TV, the copy-protection
applied to some DVD programs could affect
picture quality. If you still experience problems
after checking your connections, please try
connecting your DVD player directly to your TV
(page 10).
The aspect ratio of the screen cannot be
changed even though you set “TV TYPE” in
“SCREEN SETUP” in the Setup Display when
you play a wide picture.
• The aspect ratio is fixed on your DVD.
• Depending on the TV, you may not change the
aspect ratio.
MD deck
An MD cannot be inserted.
• Insert the MD with the label side up and the arrow
pointing toward the deck.
The controls do not work.
• Replace the MD with a new one.
• Retry the operations after “TOC” turns off.
• If M-crew is active or present in the task tray at the
bottom right of the screen, quit M-crew and then
perform the operation.
Play does not start.
• Replace the MD.
• Insert the MD and leave the system turned on for
a few hours until the moisture evaporates.
•Press MD N to start play.
• Press MD GROUP until “GROUP ON”
disappears to cancel the Group Function.
The sound skips.
• Replace the MD.
• Try moving the system to a place without
vibration (e.g., on top of a stable stand).
• Try moving the speakers away from the system, or
placing them on separate stands. When you listen
to a track with bass sounds at high volume, the
speaker vibration may cause the sound to skip.
• Insert the disc and wait for 10 to 20 minutes with
the system turned on.
Play does not start from the first track.
• Press PLAY MODE repeatedly until both “PGM”
and “SHUF” disappear to return to Normal Play.
“OVER” appears.
• You have reached the end of the MD. Press and
hold m or press . to return to the desired
playing position.
“OVER” lights up during recording.
• Adjust the recording level lower (page 49).
Recording or editing was done, but the TOC is
not updated.
• MD recording and editing contents are recorded to
the MD when the MD is removed, so make sure
you remove the MD after recording or editing
(pages 42 and 50).
The track is not deleted.
• Perform check-in the track with SonicStage for
Sony Net MDs and delete the track (page 83).
Recording is not possible.
• Remove the MD and slide the tab to close the slot
(page 42).
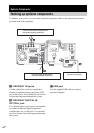
• Connect the optional component properly
(page 84).
• Press FUNCTION repeatedly to select the
recording source correctly.
• Replace with a recordable MD.
• Replace the MD with a recordable MD, or use the
Erase Function to erase unnecessary tracks
(page 55).
• Start recording again.