


97
STEPS TO ERASE FUNCTION-KEY SEQUENCES
To erase sequences, follow the same steps as if you were going to store the commands, up to when you iden-
tify the page and key address where the individual commands are stored. Instead, press the PROGRAM key
to erase the sequence and exit.
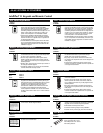
Step 1
- Press the PROGRAM button once, then the NEXT button five times. The (FUNCTION KEY IR)/SEQ
LED turns on GREEN, the TRIGGER LED turns on RED, and the PAGE LED blinks RED.
Step 2
- Press a Master-Key to identify the Master-Key Page where the Function Key that triggers the
sequence is located. To erase a sequence located on the Default Page, press the OFF Key.
The TRIGGER LED remains on, the PAGE LED turns off, and the KEY LED blinks RED.
Step 3
- Press the actual Function Key that triggers the sequence.
The TRIGGER LED turns off, the PAGE LED blinks RED, and the KEY LED turns off. The sequence that was
previously built is automatically erased at this point.
Step 4
- Press the PROGRAM button. The KEY LED blinks RED.
Step 5
- To erase other Function Keys within the same page, repeat steps 2 and 3.
Step 6
- Press PROGRAM twice to erase Function-Key Sequences in other Master-Key Pages. Repeat steps
2 through 5.
or
Press PROGRAM three times to exit. Press the PROGRAM button to exit.
TRANSFERRING IR CONFIGURATION PROGRAMS BETWEEN A4.6CI’s
An A4.6Ci that is programmed with an IR configuration may have its program contents transferred to a second A4.6Ci.
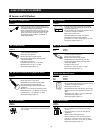
Step 1. Connect one end of a DB-9 null modem cable (pins 2 and 3 reversed and pin 5 to 5) to the A4.6Ci
that contains the configuration you wish to transfer. (Refer to this A4.6Ci as the "output unit".)
Step 2. Connect the other end of that DB-9 null modem cable to the A4.6Ci to which you wish to transfer
the configuration. (Refer to this A4.6Ci as the "input unit".)
Step 3. Press and hold the TRANSFER button on the output unit for two seconds.
The Page LED and the Key LED blink RED in tandem to indicate you are initiating a transfer-mode session.
To cancel the session and return to normal-operation mode, press the TRANSFER button again.
Step 4. Press and hold the OUT button on the output unit for two seconds.
The Page LED and the Key LED stop blinking and turn solid RED to indicate the transfer has begun.
The "INPUT ASSIGN/ZONE-SYS. SEQ." LED and the "FUNCT. KEY IR/FUNCT. KEY SEQ." LED blinks GREEN.
The input unit illuminates the PAGE LED and the KEY LED solid RED and the "INPUT ASSIGN/ZONE-SYS.
SEQ." LED and the "FUNCT. KEY IR/FUNCT. KEY SEQ." LED blink RED to indicate a transfer has begun.
Step 5. ALL LEDs, except the POWER LED on the programming panel for both A4.6Ci's, turn OFF when
the transfer is complete and both A4.6Ci's are put back into normal-operation mode.
Important Note: You can also transfer a configuration by driving the input unit. Follow the same steps described
above for the output unit, except instead of pressing the OUT button, press the IN button.
PROGRAM-EDITING STEPS