


7
Configuring Various Settings
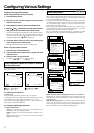
5-1. IP Address Sub-menu
You can use this submenu to turn on/off the DHCP and Auto IP
functionality.
Also, you can use this menu to manually configure network settings.
Referring to the documentation from your ISP, enter the IP address and
subnet mask assigned to your DTR-8.3 as well as the IP addresses of the
default gateway and DNS server.
After necessary settings complete, press the Return button to go back to
“5. Network Setup Menu”, select “→ Save Settings”, and press the Enter
button to save the setting you made.
When you set a.DHCP/AUTO IP to Off, select an menu item under b.
and press the Enter or
button, the DTR-8.3 enters the number-entry
mode.
Select a number using the
/ buttons, and press the Enter button to
enter the number.
After all the necessary numbers are entered, the DTR-8.3 exits the
number-entry mode.
a. DHCP/AUTO IP
Sets whether the network setting is configured automatically or not.
On: The network setting will be configured automatically. When you set
this option to On, the values for b. through f. will be assigned using
DHCP.
Off: The network setting is configured manually.
b. IP Address
You will enter this value when you set the a.DHCP/AUTO IP setting
above to Off.
Enter the IP address assigned to your DTR-8.3. If your DTR-8.3 is
directly connected with an xDSL modem or terminal adapter, be sure to
enter the static IP address exactly as specified by your ISP.
Specify the IP address within the range below. The Audio Network
Server cannot be used with the IP addresses out of the ranges below.
CLASS A: 10.0.0.0–10.255.255.255
CLASS B: 172.16.0.0–172.31.255.255
CLASS C: 192.168.0.0–192.168.255.255
Because the most of the routers commercially available is set to the
CLASS C IP address, specify the CLASS C IP address for the DTR-8.3.
c. SUBNET Mask
You will enter this value when you set the a.DHCP/AUTO IP setting
above to Off.
Enter the subnet mask. If your DTR-8.3 is directly connected with an
xDSL modem or terminal adapter, be sure to enter the subnet mask
exactly as specified by your ISP. Usually, enter 255.255.255.0 here.
d. Gateway
You will enter this value when you set the a.DHCP/AUTO IP setting
above to Off.
Enter the IP address of the default gateway. If your DTR-8.3 is directly
connected with an xDSL modem or terminal adapter, be sure to enter the
gateway address exactly as specified by your ISP. If your DTR-8.3 is
connected to a gateway/router, enter the IP address of the gateway/
router.
DNS Server
e. 1st
f. 2nd
You will enter this value when you set the a.DHCP/AUTO IP setting
above to Off.
Enter the IP address of the DNS server. If your DTR-8.3 is directly
connected with an xDSL modem or terminal adapter, be sure to enter the
DNS address exactly as specified by your ISP.
When your Internet service provider provides only one DNS address
with you, enter this address into “e.1st”. When two or more DNS
addresses are provided, enter two of them into “e.1st” and “f.2nd”
respectively.
Note:
After setting, allow approx. 2 seconds until the DTR-8.3 stores all of the
data in the memory. Be sure not to turn off the power during that time
otherwise the data will be lost.
5-2. Proxy Setup Sub-menu
Configure this item if your DTR-8.3 uses a proxy server to connect to the
Internet.
Enter the proxy server settings exactly as specified by your ISP.
After necessary settings complete, press the Return button to go back to
“5. Network Setup Menu”, select “→ Save Settings”, and press the Enter
button to save the setting you made.
a. Proxy Server
Sets whether the DTR-8.3 connects to Internet radio station through
proxy server or not.
On: Connects to Internet radio station through Proxy Server.
Off: Connect to Internet radio station without Proxy Server.
b. Proxy Address
Enter the domain name of the proxy server.
When you set a.Proxy Server to On, select this menu item and press the
Enter or
button, the DTR-8.3 enters the character-entry mode.
Select a character using the
/ / / buttons, and press the Enter button
to enter the character.
After all the necessary characters are entered, the DTR-8.3 exits the
character-entry mode.
c. Proxy Port
Enter the port number of the proxy server.
When you set a.Proxy Server to On, select this menu item and press the
Enter or
button, the DTR-8.3 enters the number-entry mode.
Select a number using the
/ / / buttons, and press the Enter button
to enter the number.
After all the necessary numbers are entered, the DTR-8.3 exits the
number-entry mode.
Note:
After setting, allow approx. 2 seconds until the DTR-8.3 stores all of the
data in the memory. Be sure not to turn off the power during that time
otherwise the data will be lost.
5-3. MAC Address Sub-menu
You can view the assigned MAC address. Every network port is
identified by a unique MAC address. (This is read-only information.)
a. MAC Address
Displays the MAC address assigned to your DTR-8.3.