


35
3. Turn on the connected component and start playing
the desired media.
4. If necessary, adjust the output level of each speaker
as desired (see page 34).
Adjust the volume at each speaker so that all the volumes sound
at the same level at the listening position. For the front right,
front left, center, surround right, surround left, surround back
right, and surround back left speakers, the output levels can be
adjusted between –12 and +12 decibels. The subwoofer can be
adjusted between –30 and +12 decibels.
Note:
If you change the speaker levels in step 4 above, these new levels for
multichannel sources will have no effect on the settings at Setup Menu
→ Speaker Setup Menu → Level Calibration Sub-menu (see page 48).
5. Adjust the volume with the MASTER VOLUME dial (or
the VOL
buttons on the remote controller.)
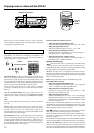
Changing the listening mode:
Each time you press the DIRECT/PURE AUDIO button on the front panel,
the display changes between “Direct”
“Pure Audio.” When using a
remote controller, press Pure Audio or Direct in the AV amp 2/4 screen.
Using the tone control:
1. Press the SURROUND button on the front panel (or the
SURR button on the remote controller) to display
“Tone On.”
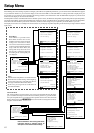
2. Adjust the tone at Setup Menu → Audio Adjust Menu
→ Tone Control Sub-menu (see page 56).
Press the DIRECT/PURE AUDIO button on the front panel (or the
DIRECT button on the remote controller) to turn off the tone control.
When using the remote controller, select AV Amp in the Home
menu to display the operation menu.
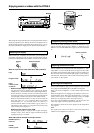
Changing the audio mode
Press the Audio Selector button on the front panel (or Audio Sel
button on the remote controller) to change the audio mode. Each
time the button is pressed, the mode changes from “Auto” →
“Multich” → “Analog” and back to “Auto.” The “Auto” audio mode
is recommended for normal circumstances.
Auto (automatic detection): With this setting, the DTR-8.3
automatically detects whether the input signal is digital or analog.
When a digital signal is not input, then the analog signal is played.
This setting only appears if a digital input is selected for the Digital
Input setting at Setup Menu → Input Setup Menu → Digital Setup
Sub-menu (see page 49).
Multich (Multichannel): Select this setting to play back the input
from the component connected to the MULTI CHANNEL INPUT
port. This setting only appears if “Yes” is selected for the
Multichannel setting at Setup Menu → Input Setup Menu →
Multichannel Setup Sub-menu (see page 50).
Analog: Select this setting to play back the input from a source
component connected to analog audio input jacks. With this setting,
even if a digital signal is input from the same component, only the
analog signal will be output.
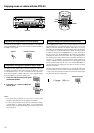
Enjoying the multichannel output
Before starting operations, first make sure that the multichannel
connection is properly made and that “Yes” is selected for the
Multichannel setting at Setup Menu → Input Setup Menu →
Multichannel Setup Sub-menu (see page 50).
1. Press the input source button for the component
connected to the MULTI CHANNEL INPUT on the rear
of the DTR-8.3.
2. Select “Multich” using the Audio Selector button on
the front panel (or Audio Sel button on the remote
controller in the AV amp 1/4 screen).
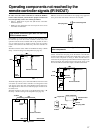
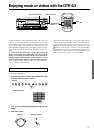
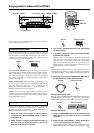
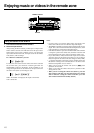
Enjoying music or videos with the DTR-8.3
DTR-8.3
Remote controller
DTR-8.3 Remote controller
+
–
CH
VOL
MUTE
CONT
+
–
LIGHT
L
Audio Selector
VOL
Audio Sel
Master Volume
Direct/Pure Audio
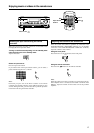
Audio
Selector
Master Volume
Input source buttons
Direct/
Pure Audio
DTR-8.3 Remote controller
VOL
DTR-8.3 Remote controller
Audio
Selector