


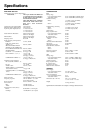


6
Network Setup Menu
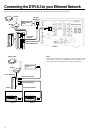
Before you can use the DTR-8.3 to play music contained in the music
library on the Audio Network Server and listen to Internet radio, you
must correctly configure the DTR-8.3’s network settings so that it can
connect to your LAN and the Internet.
It is strongly recommended to use a broadband connection (via an xDSL
or CATV leased line) and a router. If you are connected to the Internet
via a narrowband dialup connection, you may not be able to enjoy
Internet radio as you expect or at all.
Before setting up the DTR-8.3, make sure that you are already using a
router that provides Internet access and that the DTR-8.3 is correctly
connected with your router or hub via a LAN cable.
For more information on Internet connectivity, consult with your ISP
(Internet Service Provider) or refer to the documentation of your router.
DHCP (Dynamic Host Configuration Protocol) and AutoIP are
mechanisms for network configuration, which assign IP addresses
automatically to the network devices such as the DTR-8.3, PC, and
broadband router.
DNS (Domain Name System) is a mechanism which translates domain
names into IP addresses or vice versa. Domain names such as
www.onkyo.co.jp are used for Web browsing, and IP addresses such as
210.199.170.69 are used for actual network data transfer.
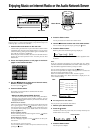
5.Network Setup
1.IP Address
2.Proxy Setup
3.MAC Address
4.Client Setup
→Save settings
|ENTER|Quit:|SETUP|
Advanced Menu
Advanced Menu
5.Network Setup
1.Speaker Config
2.Speaker Distance
3.Level Calibration
4.Bass Peak Level
|ENTER| Quit:|OSD|
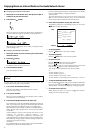
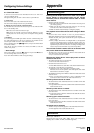
5-1.IP Address
a.DHCP/AUTO-IP :On
b.IP Address
:192.168. 9. 62
c.SUBNET Mask
:255.255.255. 0
d.Gateway
:192.168. 9. 1
DNS Server
e.1st:210.134.143. 7
f.2nd:125. 40.104. 0
Advanced Menu
5.Network Setup
1.Speaker Config
2.Speaker Distance
3.Level Calibration
4.Bass Peak Level
|ENTER| Quit:|OSD|
5-2.Proxy Setup
a.Proxy Server
:On
b.Proxy Address
c.Proxy Port
: 8080
Quit:|SETUP|
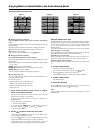
Advanced Menu
5.Network Setup
1.Speaker Config
2
.Speaker Distance
3.Level Calibration
4.Bass Peak Level
Quit:|OSD|
5-3.MAC Address
a.MAC Address
:XX:XX:XX:XX:XX:XX
Quit:|SETUP|
Advanced Menu
5.Network Setup
1.Speaker Config
2
.Speaker Distance
3.Level Calibration
4.Bass Peak Level
uit:|OSD|
5-4.Client Setup
a.Client Name
:TX-NR900 0102
b.Wakeup on LAN
:On
c.NTSP Port
:XXXXXX
Quit:|SETUP|
Navigating through the Setup Menu:
When using the buttons on the front panel
1. Press the Setup button.
2. Using the
and cursor buttons, select the menu
that you want to enter.
3. Press the Enter button to enter the selected menu.
4. Use the and cursor buttons to select the sub-menu
that you want to enter and press the Enter button.
Each sub-menu has different settings that can be changed as desired,
and they are all explained in the pages that follow. To change a
setting, first select it using the
and cursor buttons, and then
change the setting using the
and cursor buttons.
5. Press the Return button to set the new settings and
return to the previous menu screen.
Press the Return button again to return to the main menu.
When using the remote controller
1. Select AV Amp in the Home menu.
2. Tap the down scroll button twice to display the third
operation menu.
3. Perform steps 1 to 5 given above.
Use buttons / / / insted of / / / buttons.
Input Setup Menu (When NET AUDIO is selected
as the input source)
When NET AUDIO is selected as the input source, you can set up Music
Server on this screen.
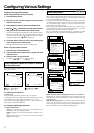
2-1. Music Server Sub-menu
a. Select Server
Select the Audio Network Server that exists on the network.
* mark appears to the servers detected on the network. If there is a server
which does not have * mark, make sure that the server is started.
After selection, use the or button to select “→ OK”, and press the
Enter button to confirm your selection.
2-2. Playback OSD Display Sub-menu
a. Playback OSD Display
Full: Select this when you want to have the OSD display the
information on the currently played track.
Simple: Displays the current track information summary in two
lines.
Off: Select this when you do not want to have the information
displayed on the OSD.
Configuring Various Settings
2-1.Music Server
a.Select Server
:Server-ABCD
→OK
Quit:|SETUP|
Input:NET A
2-2.Playback OSD Display
a.Playback OSD Display
:Full
Quit:|SETUP|
Input:NET A