


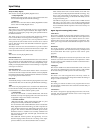


63
Normal: Select to have the OSD Setup Menu superimposed
over the current video if one is displayed or on the selected
background color if there is no video signal.
Black: Select to have the OSD Setup Menu displayed on a black
background at all times.
c. Immediate Display
On: Select to have the screen immediately display certain
operations as you perform them (e.g., having the input source
displayed whenever an input source selector button is pressed).
The display will remain for five seconds after the operation is
completed.
Off: Select to turn off the immediate display of operations.
d. Display Position
Use this setting to select the position of the immediate display that
appears when certain operations are performed. You can position the
immediate display at any of ten different levels ranging from the top
all the way to the bottom.
e. TV Format
(Australian model only)
The default setting is “Auto,” which means that the television format
is detected and automatically set by the DTR-8.3. However, if you
know the correct format, you can use this setting to choose either
PAL or NTSC so that no time is wasted on detection.
4-4. OSD Position Sub-menu
This sub-menu allows you to adjust the position of the OSD Setup
Menu as it is displayed on your screen. Depending on the monitor
used, there may be cases where the OSD Setup Menu is not
displayed in the center and parts of the menus are cut off. To adjust
the position of the OSD Setup Menu, simply press the cursor buttons
to inch the menu to position you desire.
4-2. Headphones Level Sub-menu
If you notice a large difference in the volume when listening to the
headphones from when listening to the speakers, you can change the
headphone volume level so that you do not have to make
adjustments with the main volume dial each time you put on the
headphones.
The headphone volume can be adjusted between –12 and +12
decibels.
4-3. OSD Setup Sub-menu
This sub-menu allows you to customize the OSD Setup Menu to
display in the manner you desire.
a. Background Color
Select either Blue1, Blue2, Green1, Green2, Magenta, Red1, or
Red2 as the background color when the OSD Setup Menu is
displayed.
(USA and Canadian model)
b. Component Video
You can select whether the OSD signal is output to the TV monitor
connected to the COMPONENT VIDEO connectors or not.
OSD On: The OSD signal is output.
OSD Off: The OSD signal is not output.
(Australian model)
b. Superimpose Mode
Off: Select to have the OSD Setup Menu displayed on the
selected background color. If this is set to “Off,” the background
color will not be displayed even when there is no video signal
input.
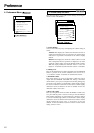
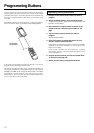
Preference
VIDEO 1
Advanced Menu
4.Preference
4-4.OSD Position
Exit:|RETURN|
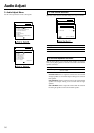
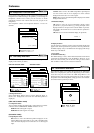
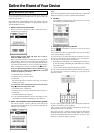
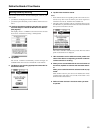
Advanced Menu
4.Preference
4-2.HeadphoneLevel
a.Headphones Level
: 0dB
Quit:|SETUP|
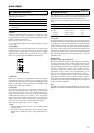
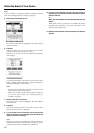
Advanced Menu Advanced Menu
4.Preference
4.Preference
4-3.OSD Setup
a.Background Color
:Blue1
b.Superimpose Mode
:Normal
c.Immediate Display
:On
d.Display Position
:Bottom
e.TV Format :Auto
Quit:|SETUP|
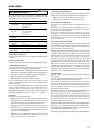
4-3.OSD Setup
a.Background Color
:Blue1
b.Component Video
:OSD On
c.Immediate Display
:On
d.Display Position
:Bottom
e.TV Format :Auto
Quit:|SETUP|
USA and Canadian model: Australian model: