58
Preference
You can adjust the volume output from the headphones so that it
matches the level output from the speakers.
1. Display the main menu.
Press the Setup button on the front panel or the remote
controller to display the main menu on the monitor and the front
display.
2. Use the and cursor buttons to select “6. Preference”
and then press the ENTER button.
The “Preference” menu appears.
3. Use the and cursor buttons to select “a. Headphone
Level” and then press the ENTER button.
4. Use the and cursor buttons to adjust the
headphone level.
The headphone volume can be adjusted between –12 and +12
decibels.
5. Press the Return button to return to the main menu.
Press the Setup button on the front panel or the remote
controller to exit the Setup menu.
You can choose the OSD background color from four different
colors.
1. Display the main menu.
Press the Setup button on the front panel or the remote
controller.
2. Use the and cursor buttons to select “6. Preference”
and then press the ENTER button.
The “Preference” menu appears.
3. Use the and cursor buttons to select “b.
Background Color” and then press the ENTER button.
4. Use the and cursor buttons to adjust the
background color.
Select either Blue, Green, Magenta, or Red as the background
color when the OSD Setup Menu is displayed.
5. Press the Return button to return to the main menu.
Press the Setup button on the front panel or the remote
controller to exit the Setup menu.
Adjusting the headphones volume level
Setting the background color for OSD
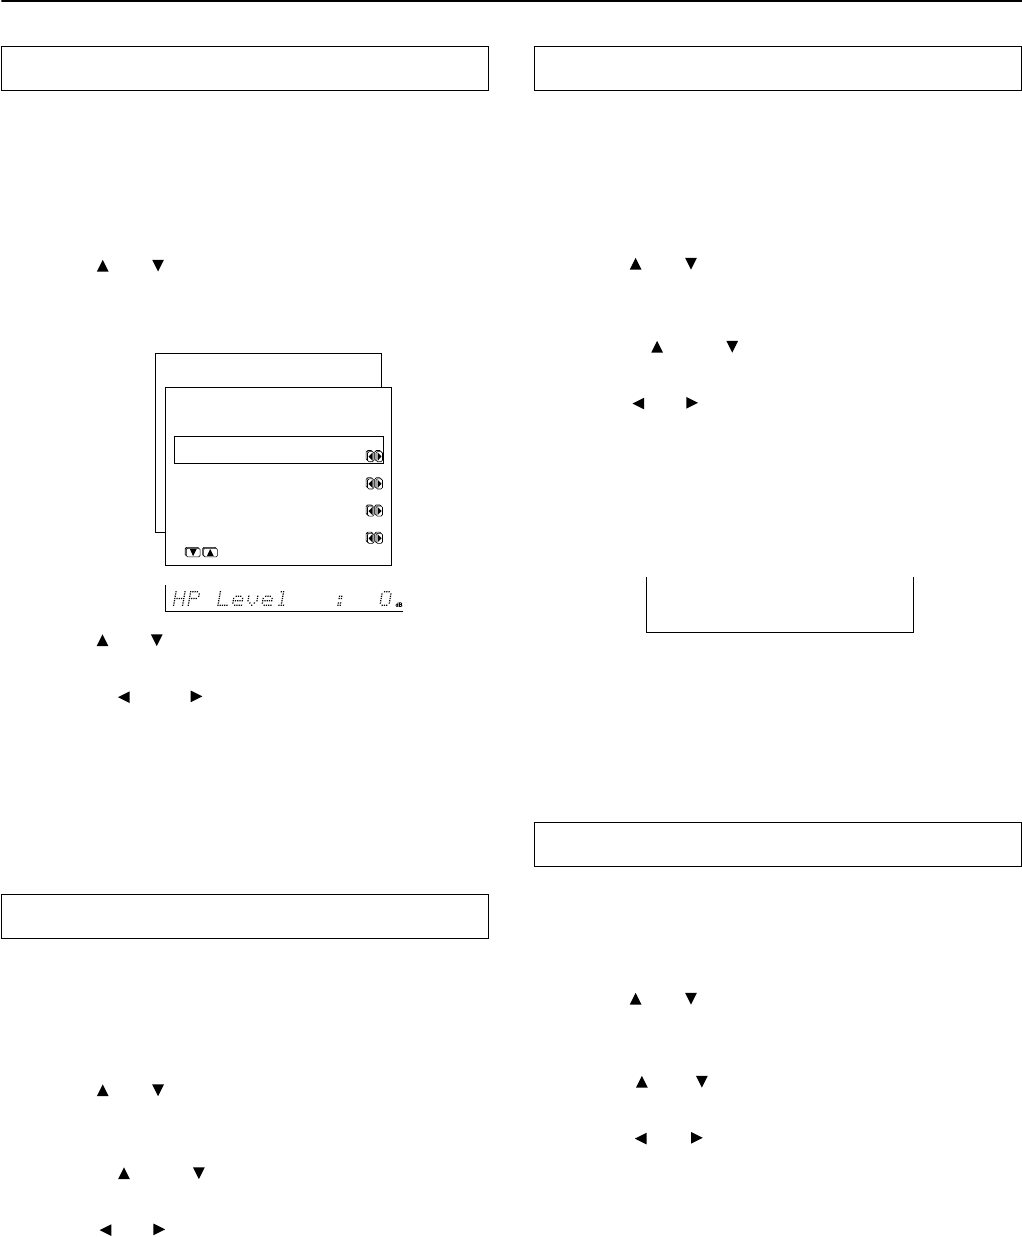
* Menu *****************
1.Speaker Config
2.Speaker Distance
3.Level Calibration
4.Input Setup
5.OSD Setup
6.Preference
6.Preference
***********************
a.Headphone Level
: 0dB
b.Background Color
:Blue
c.Immediate Display
:Normal
d.Volume Display
:Absolute
Quit:|SETUP|
DTR-6.4/5.4
When you switch the listening mode or change the volume level,
some information is displayed on OSD. You can change the
preferences for OSD such as the display position.
1. Display the main menu.
Press the Setup button on the front panel or the remote
controller.
2. Use the and cursor buttons to select “6. Preference”
and then press the ENTER button.
The “Preference” menu appears.
3. Use the and cursor buttons to select “c.
Immediate Display” and then press the ENTER button.
4. Use the and cursor buttons to adjust the
immediate display.
Off: Select to turn off the immediate display of operations.
Normal: Select to display operations in the bottom right corner
of a TV screen with a 4:3 aspect ratio.
Wide: Select to display operations in the bottom right corner of
a TV screen with a 16:9 aspect ratio.
Hint:
If this is set to “Off,” the background color will not be displayed
even when there is no video signal input.
5. Press the Return button to return to the main menu.
Press the Setup button on the front panel or the remote
controller to exit the Setup menu.
You can choose from two ways of displaying the volume setting on screen.
1. Display the main menu.
Press the Setup button on the front panel or the remote
controller.
2. Use the and cursor buttons to select “6. Preference”
and then press the ENTER button.
The “Preference” menu appears.
3. Use the and cursor buttons to select “d. Volume
Display” and then press the ENTER button.
4. Use the and cursor buttons to adjust the volume
display.
Absolute: This displays the volume with a minimum of Min.
for no sound and 1, 2...99, and a maximum of Max. As a
reference, the volume setting of Ref (82) is equivalent to 0
decibels for the relative display method.
Relative: This displays the volume as a decibel value on a scale
with a designated reference point that is displayed as 0, which
equals the volume setting of 82 of the absolute display method.
With this display method, the minimum value is –∞, the next
highest is –81, and the maximum value is +18.
5. Press the Return button to return to the main menu.
Press the Setup button on the front panel or the remote
controller to exit the Setup menu.
Switching the OSD display mode
Changing the volume level display setting
VIDEO 1