


92
GB
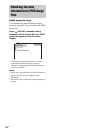
The JPEG image file cannot be played back.
• Recording was not performed according to the
ISO 9660 Level 1, Level 2, or Joliet in the
expansion format.
• The JPEG image file does not have the extension
“.JPG” or “.JPEG”.
• The data is not stored in JPEG format.
• The image is larger than 3,072 (width) × 2,048
(height) in normal mode, or more than 3,300,000
pixels in Progressive JPEG mode.
• The “MODE (MP3, JPEG)” setting has been set to
“AUDIO (MP3)” (page 30).
• The system can play back to a depth of 8 folders
only.
• JPEG image files with a high width to length ratio
cannot be played back.
• The disc contains more than 200 albums.
• The album contains more than 600 files when the
“MODE (MP3, JPEG)” is set to “IMAGE
(JPEG)”.
• The album contains more than 300 files when the
“MODE (MP3, JPEG)” is set to “AUTO”.
• The DATA CD contains a DivX video file.
• This system cannot play back JPEG image files
recorded on DATA DVDs.
The disc title, album title, track title, CD-TEXT
and DVD-TEXT characters do not appear
properly.
• Use a disc that conforms with ISO 9660 Level 1,
Level 2, or Joliet in expansion format.
• The character code that can be displayed by this
system are as follows:
– Upper cases (A to Z)
– Lower cases (a to z)
– Numbers (0 to 9)
– Symbols (< > * +, – / [ ] \ _)
Other characters may not be displayed correctly.
The surround effect is difficult to hear when
you are playing a Dolby Digital or MPEG audio
sound track.
• Make sure the sound field is set properly
(page 67).
• Check the speaker connections and settings (pages
10 and 49).
• Depending on the DVD VIDEO, the output signal
may not be the entire 5.1 channel. It may be
monaural or stereo, even if the sound track is
recorded in Dolby Digital or MPEG audio format.
The sound loses stereo effect when you
playback an AUDIO CD, VIDEO CD, MP3 audio
track, DivX video file or DVD VIDEO .
• Unplug the microphone or press KARAOKE
MODE repeatedly until “m” dissappears from the
display.
• Make sure the system is connected properly.
Picture
There is no picture.
• Press FUNCTION +/– repeatedly to select
“DVD” (or press DVD on the unit).
• Check that the system is connected securely.
• The video cord is damaged. Replace it with a new
one.
• Make sure you connect the unit to the video input
jack of your TV (page 10).
• Make sure you turn on the TV and operate the TV
correctly.
• Press PROGRESSIVE on the unit repeatedly to
select “INTERLACE” if you connect your TV to
the unit’s COMPONENT VIDEO OUT jacks and
your TV cannot accept the progressive signal.
• You have set progressive format but your TV
cannot accept the signal in progressive format. In
this case, return the setting to interlace format (the
default setting) (page 54).
• Even if your TV is compatible with progressive
format (525p/625p) signals, the image may be
affected when you set progressive format. In this
case, return the setting to interlace format (the
default setting) (page 54).
• Make sure you select the video input on the TV so
that you can view the pictures from the system.
• Make sure you set the color system correctly,
according to your TV color system.
• Make sure you connect the unit and your TV using
only the supplied video cord.
Picture noise appears.
• Clean the disc.
• If video signal from your system has to go through
your VCR to your TV, the copy-protection
applied to some DVD VIDEO programs could
affect picture quality. If you still experience
problems after checking your connections, please
try to connect your unit directly to your TV’s
S Video input (page 11).
• Set the color system to match your TV (page 43).