


37
C4630 SE HOME AUDIO SYSTEM
• The remote will automatically be added to the USER.CML
library.
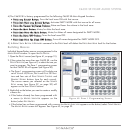
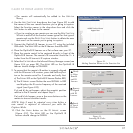
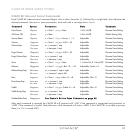
4. Use the A
DD FUNCTIONS drop-down box (see
Figure 50
) to add
the names of the new remote functions you’re going to capture.
Select the function names in the drop-down box and click the
A
DD button to add them to the remote.
• If you’re creating a new remote you can use the N
EW FUNCTION
WIZARD to add all of the function names typical for that type of
remote and use the D
ELETE
FUNCTIONS button to delete the ones
that aren’t on the remote you’re going to capture.
5. Connect the OptiLinQ IR Learner to your PC using the included
USB cable. The M
ODE LED on the IR Learner should be RED.
6. Place the OptiLinQ IR Learner on a flat surface near your PC.
7. Place the remote control to be captured directly in front of the
OptiLinQ IR Learner. The remote’s IR transmitter should be 3 – 6
inches from the IR Learner’s IR capture window.
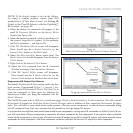
8. Select the C
APTURE tab on the Infrared Library Manager screen (see
Figure 51A
, on page 38). The MODE LED on the OptiLinQ IR
Learner should change to ORANGE.
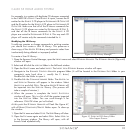
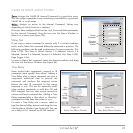
9. To ensure that the remote’s IR emitter is properly aligned
with the IR Learner’s IR receiver, press and hold any but-
ton on the remote control for 3 seconds and verify that:
a) The S
IGNAL LED on the OptiLinQ IR Learner flashes RED,
b) The IR L
IBRARY screen flashes the word SIGNAL in RED
and displays the IR carrier frequency of the received
signal (see
Figure 51B
).
If a) and b) do not happen, adjust the remote’s position
relative to the IR Learner and repeat Step 9.
If a) and b) do happen, press a few more buttons on the
remote to ensure consistent results.
NOTE: Step 9 must be repeated every time before a
new remote is captured or whenever you enter the
Capture Mode.
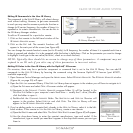
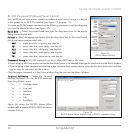
10. Click the LEARN button on the IR LIBRARY screen
(
Figure 51C
). The MODE LED on the OptiLinQ IR
Learner should change to GREEN.
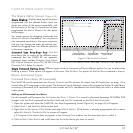
Add Functions Box/
New Functions Wizard
Delete Functions
Button
Added Function Names
Appear Here
Figure 50:
Adding Function Names to the Function List
Capture Tab
Figure 51:
Learning IR Codes
A:
Ready
to Align
Remote
and IR
Learner
B:
Remote
is Aligned
with IR
Learner
C:
Ready
to Learn
IR Code