


12
C4630 SE HOME AUDIO SYSTEM
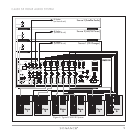
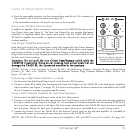
Source Output Connections
FFoorr RReeccoorrddiinngg::
Connect a stereo RCA audio cable from one set of C4630 SE L&R Source Output jacks to the record inputs
on the recording device. This allows the source component connected to the corresponding Source Input jacks to be recorded.
WWhheenn UUssiinngg MMuullttiippllee CC44663300 SSEE CCoonnttrroolllleerrss::
In a system that incorporates multiple C4630 SEs, you can feed up to
four common sources to any or all of the controllers.
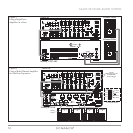
1. Designate one C4630 SE as the P
RIMARY controller and the others as SECONDARY controllers.
2. Connect the source components to the Source Inputs on the P
RIMARY
C4630 SE as described above.
3. For each source that you want to feed to the S
ECONDARY controllers, connect a stereo RCA audio cable from its Source
Output Jacks on the P
RIMARY C4630 SE to the corresponding set of Source Input jacks on the SECONDARY C4630 SE
(S
OURCE 1 OUT to SOURCE 1 IN, etc.). You can repeat this for up to four C4630 SE Controllers (24 zones). This will feed
audio from up to four common sources to all zones in an expanded system.
Speaker Connections
CCAAUUTTIIOONN::
AAllwwaayyss
uunnpplluugg
tthhee
ccoonnttrroolllleerr’’ss
ppoowweerr
ccoorrdd
ffrroomm
tthhee
wwaallll
oouuttlleett
bbeeffoorree
mmaakkiinngg
oorr
cchhaannggiinngg
ssoouurrccee
oorr
ssppeeaakkeerr
ccoonnnneeccttiioonnss..
Use Good Speaker Wire
For the best sound you should never use thin-gauge speaker wire – it will constrict the sound and diminish bass response.
We recommend that you use premium Sonance MediaLinQ speaker cable, which also complies with UL fire rating codes. You
may also experiment with audiophile brands of speaker cable, but be sure to check local codes governing wire that
may be installed within walls or ceilings. Use at least 18 AWG speaker wire for runs up to 50’, at least 16 AWG for runs
up to 100’ and at least 14 AWG for runs up to 250’.
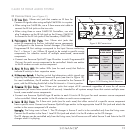
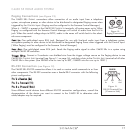
Wiring the Speaker Connectors
The C4630 SE’s speaker outputs are rated for 8-ohm nominal speakers.
1. Run speaker wire from each speaker to the controller location. We recommend that you
mark each wire’s positive (‘+’) and negative (‘–’) leads, its channel (left or right) and
which zone it is from so that you can connect it to the proper speaker terminals.
2. Strip no more than ¼” of insulation from each speaker lead. Twist the strands or tin the
exposed wire with solder to ensure that there are no stray strands. (Stray strands that
touch each other or touch the controller chassis can cause a short-circuit that can dam-
age the amplifier.)
3. The C4630 SE has six removable 4-wire speaker connectors (one for each zone) that
can accept wire up to 14AWG. The connector features set screws that secure the wires.
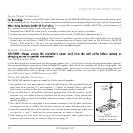
4. Insert the exposed portions of the speaker wires into the terminal openings. Make sure
to insert the ‘+’ and ‘–’ leads into the correct openings, as shown in
Figure 5
.
5. After making sure that there are no stray wires touching each other, tighten the set
screws to secure the wires, as shown in
Figure 6
, on page 13.
L
+
L
–
R
–
R
+
Use
Screwdriver
to Tighten
Set Screws
Figure 5:
Wiring the Removable
Speaker Connectors