


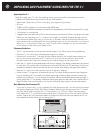

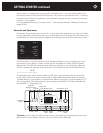
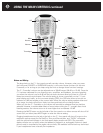


The buttons are surrounded by a blue halo of light when the C 1 is turned on; the halo around
every button (except DIM and STATUS) glows brighter when that button is pressed, and remains
bright as long as the button’s function is active. The MUTE and MENU buttons stay active and
bright until you turn them off. The SOURCE and SURROUND buttons, on the lower row, stay
active and illuminated for 5 seconds, or for as long as you keep turning the knob to alter their set-
tings. The ZONE button stays active and illuminated for 10 seconds, or for as long as you keep
altering control settings. When any of these three buttons is active, the front-panel display will
show the name of the control; for SOURCE and SURROUND it will also show a circular arrow
(indicating that you can make selections for that button by turning the knob). When you turn the
knob, the OSD on your video screen will show the settings for each input as you reach it.
•
When the front-panel ON-OFF button is switched off, the halo around it glows soft blue and the
Parasound logo glows soft red. When the C 1 is turned on, the logo becomes brighter, the halos
around the other buttons glow, and the front-panel display turns on. (Always turn the C 1 off
with this button, or with one of the remote controls, before turning off the master power switch
on the rear panel; this will prevent turn-off thumps being heard through your speakers.
•
The ZONE button selects whether the front-panel controls will affect the main (local) zone
(where the C 1 is) or the second (remote) zone. While the Zone button is active, all front-panel
and remote-control commands affect the remote zone in the same way they’d normally affect
the main zone. The display clearly shows when the C 1 is in remote zone mode.
•
The SOURCE button turns the control knob into an input selector that cycles backward and for-
ward through the audio and audio-video inputs.
•
The DISPLAY ZONE and DISPLAY MAIN buttons determine which zone’s video program will
appear on the front-panel video display screen.
•
Pressing DISPLAY MAIN once turns the screen on and displays status information for the main
zone. Pressing it a second time selects the video preview mode for the currently selected main-
zone video program. Pressing the button a third time turns the display screen off.
•
Pressing the DISPLAY ZONE button previews the video program currently selected for the
remote zone. Pressing the button a second time turns the display off.
•
The SURROUND button turns the control knob into a selector that cycles backward and forward
through the available sound patterns. These patterns include various flavors of real and generated sur-
round, stereo, and mono; the selection changes to match whatever input you’ve currently selected.
•
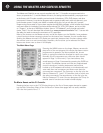
The two jacks at the far left of the panel are for headphones and for the calibration microphone
supplied with the C 1 for automatic surround calibration (see pages 30-31). When you plug
headphones in, the C 1 shuts off all main-zone outputs and switches out of surround mode.
Recording and remote-zone outputs are not affected. When headphones are plugged in,
“PHON” precedes volume readouts on the built-in display or OSD.
•
To the right of the jacks are the infrared sensor for remote control, the MUTE button (which cuts
off the outputs in whichever zone you’re controlling at the time), and DIM (which varies display
brightness), Muting is disabled when you raise the volume.
•
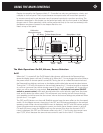
The front-panel display can show you the current status (source, operating modes, etc.) for the
main or remote zone, setup menus, and whatever video program is selected for viewing in the
main zone. The screen will remain off if neither the DISPLAY ZONE or the DISPLAY MAIN but-
ton is pressed. However, each time you adjust volume or select a different input or mode in the
main zone, it will turn on automatically to display these changes for a few seconds. You can cus-
tomize the colors and other aspects of the information display; see Display Setup on page 34.
•
Pressing the STATUS button displays the C 1 Controller’s operating status. Pressing the STATUS
button also exits any setup menu after saving your most recent selections.
•
Pressing the MENU button puts the C 1 in its setup mode and is also used to navigate between
menus, advancing to the next setup menu with each push.
All these functions can be controlled from the C 1’s Master remote, and some are controllable from
the SideKick. Both remotes can also be set up to control other components in your system, if those
components are placed where the infrared beams from the remotes can reach them.
In the next three chapters, we’ll cover the C 1’s controls in more detail, including setup adjust-
ments you (or your installer) can make to optimize the C 1 for your setup.
GETTING STARTED continued
8