


Power switch or unplug either end of the AC cord before the C 1 has first been turned off by
the remote control or front panel On-Off button! If AC power is removed from the C 1 before it
is turned off you will lose the selections you made during setup and you may hear some nasty
thumps in your speakers.
For more detailed directions to connect the C 1, see the three chapters “Making Connections”.
(pages 37-54).
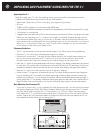
Controls and Operation
For starters, all you need to do is turn the C 1 on and wait a few seconds for it to “boot up.” Select
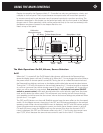
an input (see below), and raise the volume to a comfortable level. The display will show which input
is selected and to what input jacks it’s assigned, the listening mode, and the current volume level.
This information is normally visible on the front-panel display, but is not normally part of the
information you can feed to a video monitor via the composite or S-Video OSD (on-screen
display) jack. The OSD will, however, show briefly any changes in control settings. Raise the
volume 1 decibel, for example, and the bottom of the screen will show something like this:
-19 dB
––––––––––––––––-|–––-|––––
The bar-graph above has a vertical marker at 0 dB, plus a second marker (the one at the left,
in this case) to show the current volume setting. After speaker levels have been set up (see
“Speaker Setup,” in the chapter on “Adjustments, Menus, and Setup”) a volume setting of “0”
will correspond to THX reference level, a sound pressure level (SPL) of 75 dB, measured with
the standard “C” weighting curve.
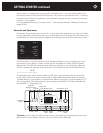
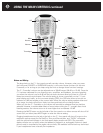
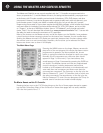
The knob at the far right normally controls volume, but pressing the appropriate buttons (see
below) turns it into a selector knob for menu items and source selection.
Controller
C1
On-Off Zone Zone Display Main Source
Status Menu
Mute DimPhones Cal Mic
Surround
LULUCA S F ILMLM
THX SURROUND EX
7.5 CHANNEL
ENHANCED
SURROUND
Audio 1
AUDIO
Signal Analog
Input: Analog 7
Mode Stereo
VIDEO
Signal No signal
Input AUTO 2
-44dB
––––––––––––-––-|–--------––-|––----–
Knob
Headphone
Output
On-Off
Calibration
Microphone Input
Display Dim
MuteIR
Zone Display
Zone
Display
Main
Source Surround
Mode
Video Display Screen MenuStatus
Audio 1
AUDIO
Signal Analog
Input: Analog 7
Mode Stereo
VIDEO
Signal No signal
Input AUTO 2
-44dB
––––––––––––-––-|–--------––-|––----–
GETTING STARTED continued
7