


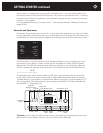


The various types of video jacks (composite, S-Video, and component) use differing connector
types, but the so-called “RCA” type used for composite video (simply labeled “Video” on the
back panel) is also used for analog and digital audio. The RCA jacks on the C 1 are color-coded:
red and white for right-and left-channel analog audio, yellow for composite video, black for digital
inputs, and red for digital output; for the 7.1-channel inputs and outputs, the surround side chan-
nel jacks are blue and gray, the center channel green, the subwoofer pink, and the surround
back channels brown and tan.
(Note: Cables designed for analog audio do not work well for digital audio or for composite
video, even though all three have the same type of plug; composite video and digital audio
cables can, however, be substituted for each other if need be.)
Recorders require output as well as input connections. If a recorder is connected to the C 1’s
Rec/Out jacks, its output should be fed to the Controller’s “Play/In” jacks. If you have a second
recorder, connect its input to the “Record 1” or “Record 2” output jacks on the C 1.
If a source component has digital as well as analog audio outputs, you’ll get better sound quality
by using its digital output, because the C 1 has truly superior digital-to-analog (as well as analog-to-
digital) converters. Moreover, by using direct digital connections you avoid putting the signal
through extra conversion stages (the digital-to-analog, or D/A, in your CD or DVD player and the
analog-to-digital, or A/D, in the C 1). If you need to use the analog inputs on the C 1 (as you will
for analog recording or for signals to be fed to a remote zone in your house), use both digital and
analog connections between your player and the C 1.
For video connections, you’ll get better picture quality from S-Video than composite video con-
nections; signals from S-Video sources also appear at the composite video outputs but not vice
versa. So, if you have both composite and S-Video signal sources, use both types of connection
between the C 1 and your TV monitor.
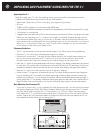
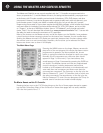
S-Video plugs and jacks only fit together it they’re oriented identically–and this orientation is not
standardized. The S-Video jacks on the C 1 are oriented as shown on views of the rear panel.
Since the cables are thick and hard to twist, it pays to look at the end of the plug to make sure
that it’s oriented the same way as the jack before you try inserting it.
If your source and your video monitor have component-video connections, which use three
cables, you’ll get even better quality by using these connections (they’re compatible with HDTV
signals); however, you’ll still have to use both component- and S-Video connections to your
monitor, because the C 1 on-screen display is not sent to the component-video outputs, and
VCRs don’t have component-video connections. If any of your monitors lack component-video
inputs, you’ll have to use S-Video (or composite) connections from each of your sources.
Note that there are two sets of composite video and S-Video outputs, one with OSD (on-screen
display) and one without. The one with OSD should be connected to a monitor in the same room
as the C 1. If you have a large-screen or projection system, you might want to connect it to the
S-Video output labeled “No OSD” so that your guests won’t have to see on-screen display mes-
sages. Then install a second, small, TV, connected to the composite or S-Video “OSD” output jack
so you can see the OSD.
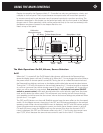
If your amplifiers or other equipment accept a trigger signal, connect the C 1’s trigger outputs
to them so that they will turn on whenever the C 1 does. The “IR” inputs let you control the C 1
from an infrared sensor in the second zone—or from a small infrared sensor in your main room,
if you want to hide the C 1 inside a cabinet. (Note: If you use remote infrared sensors, make
sure the remote beam cannot also reach the sensor on the C 1; the C 1 may not respond prop-
erly to commands it receives from two sources at the same time.)
AC Connection and Power
The C 1 operates on 90 - 260 volts, so no voltage selector switch is necessary. Plug its power
cord into an AC outlet that is always live (unswitched). The C 1 will not operate properly if it’s
plugged in to an AC outlet that might be switched off. Next press “I” on its rear-panel AC
Power switch. This will enable the C 1 to be turned on and off from its front-panel On-Off button
or remote control On and Off buttons. The only time you might want to use the AC Power
switch again is if you plan to be away for an extended time. (Note: Do not press “0” on the AC
GETTING STARTED continued
6