


Getting Started Connections Setup Remote Control Multi-Zone Information Troubleshooting Specifications
Operating the AVP-A1HDCI Using a
Browser (Web control)
This function lets you operate the AVP-A1HDCI using Internet
Explorer.
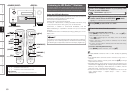
1
Switch “OFF” the “Power Saving” setting under
“Manual Setup” – “Network Setup” – “Other” on the
GUI menu (vpage 38).
2
Check the AVP-A1HDCI’s IP address with “Manual
Setup” – “Network Setup” – “Network Information”
on the GUI menu (vpage 38).
3
Enter the AVP-A1HDCI IP address in Internet
Explorer’s address box.
For example, if the IP address of AVP-A1HDCI is “192.168.11.3”,
enter “http://192.168.11.3”.
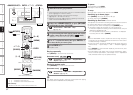
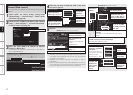
Checking the IP address.
Entering the IP address.
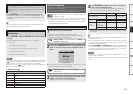
4
When the top menu is displayed, click on the menu
you want to operate.
5
Operate.
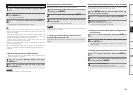
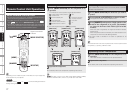
[Example 1] Main zone control screen
*1 : Normally, there is a change to the latest information each time
you operate. When operated from the main unit, click because
the screen is not updated.
*2 : Displayed when setting “Top Menu Link Setup” to “ON” in
[Example 3].
*3 : To avoid mistakenly performing menu operations of a zone you
are not operating, we recommend that you register the setting
contents for each zone under Favorites in your browser.
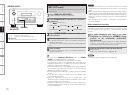
Click when
you operate
each zone.
(vExample 1)
Click when you
operate the setup
menu. (vExample 2)
Click to change
zone name.
(vExample 3)
Click when you
operate a small screen
such as a PDA screen,
etc. (vExample 4)
Click when you update to
the latest information. (*1)
Click to perform each
operation.
Changes to each operation
screen.
(vExample 5)
Click to add a setting to the “Favorites” in your browser. (*3)
Click to return to the top
menu. (*2)
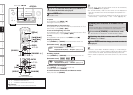
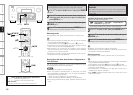
[Example 2] Setup menu screen
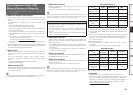
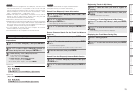
[Example 3] Zone name change screen
Click “v” and select from
the displayed items.
Click to
determine a
setting.
After entering
characters, click “Set”
to set, or click “Def” to
return to initial setting.
Enter figures or click
“<” or “>” to make
the setting, and then
click “Set”.
Click the menu from which you want to make
settings.
The display on the right becomes each setting
screen.
Click “SAVE” when you want to save settings, and click
“LOAD” when you want to call settings.
Becomes each operation screen.
Enter zone
name.
Click to set
zone name.
Click when
changing the
background
color of each
operation
screen.
Click to
return to the
top menu.
Click “ON” when
performing Top Menu
Link Setup.
When set up, return to
the top menu from each
operation screen.
(Default setting : “OFF”)
Playback