


Page: 84 Model MRC88
© 2003 Xantech Corporation
ZONE SETTINGS
SYSTEM STATUS
(BASIC/ADVANCED)
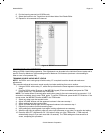
A single press of the “STATUS” button will show which sources are currently selected by zone for zones 1 thru
4. Press the STATUS button again to view the status of Zones 5 thru 8. The display will return to normal after 5
seconds of no activity.
(EXPANDED)
In Expanded mode, the first press of the Status button will show the sources selected in zones 1-8. A second
press will show zones 9-16. Subsequent presses will toggle the display.
AUDIO ADJUSTMENTS
(BASIC/ADVANCED/EXPANDED)
Balance, Treble and Bass settings can be adjusted for a zone in this mode.
1. Simultaneously press the “STATUS” and “VOL+” buttons. The ‘AUDIO SETUP MODE’ will appear
on the keypad LCD.
2. To adjust BALANCE, press the button under ‘BAL’. The ‘<’ (rewind) button will shift audio to the left
speaker. The ‘>’ (forward) button will shift audio to the right speaker. The ‘SELECT/PLAY’ button
will restore center balance. Display will return to normal after 10 seconds of no activity.
3. To adjust TREBLE or BASS, press the appropriate button in the LCD Display. The ‘<’ button will
decrease the amount of treble or bass. The ‘>’ button will increase the treble or bass. The
‘SELECT/PLAY’ button will restore the audio to the ‘flat’ setting. Display will return to normal after
10 seconds of no activity.
NOTE: Adjustments do not affect Z-ADJUST default settings.
DYNAMIC MONITOR LOCKOUT (PARENTAL CONTROL)
(ADVANCED/EXPANDED)
To ‘prevent’ the audio/video output of a source from being viewed in any of the other zones, DYNAMIC
MONITOR LOCKOUT should be engaged from the Zone that WILL be accessing the source. This is ideal to
prevent a source component with inappropriate content from being viewed by a minor or other audience.
1. Simultaneously press “STATUS and the “SOURCE” button to be locked. The ‘Monitor Locked’
message will appear. The audio/video will only be available in that zone. Message will remain until
the source is unlocked.
2. To Un-Lock, simultaneously press “STATUS and the “SOURCE” button to be unlocked. The
‘Monitor Unlocked’ message will appear. The audio/video will be available to all zones. Message
will remain until the source is selected again or another source is selected.
DYNAMIC ZONE LINK
(ADVANCED)
To temporarily tie multiple zones together to the current zone:
1. Simultaneously press “STATUS and the “CH+” button. The ‘Link Session’ message will appear
displaying current Zone Link status/choices for zones 1 thru 4. To access Zones 5 thru 8 simply
press the STATUS button a second time. To return to Zones 1 thru 4 press STATUS again to
toggle between the screens.
2. Press the button for the zone to be linked. (Z1, Z2, etc) The keypad status LEDs will show ‘busy’
(rapid amber flash) for 10 seconds after the last button press, then ‘time out’ and return to normal
use mode (LED /green, LCD/normal display). A small ‘L’ will appear in the upper right corner of the
LCD in the linked zones. The zones will be linked for power and source selection only. Volume,
Mute and individual IR buttons will not be linked.
To Unlink Zones:
1. Simultaneously press “STATUS and the “CH+” button. The ‘Link Session’ message will appear.