


Page: 52 Model MRC88
© 2003 Xantech Corporation
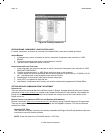
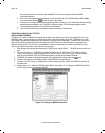
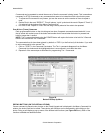
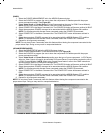
1. Select the KEYPAD tab in the MRC88 Systems window
2. Click the desired Source button on the virtual MRC88 Keypad.
3. Click the Function button you wish to place a command under and select the applicable command
from the palette for that component function. The code name (function/brand/component) for that
button will appear in the Macro Command List on the MRC88 Programming Module.
4. To add additional commands to the same button (i.e. creating a Macro Sequence), just repeat steps 2
& 3. Up to 40 Commands can be placed under each programmable button (See: “Programming
Sequences”)
5. Repeat for all buttons / all sources.
(ADVANCED/EXPANDED)
In ADVANCED and EXPANDED modes, the Keypad is totally configurable per zone. Therefore, commands
placed under a specific source bank are not automatically copied to all of the other zones keypads unless that
is your intention (see Punch All under Editing Commands). To place commands under a specific Zones
Keypad, proceed as follows:
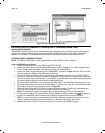
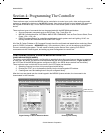
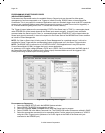
1. Select the ZONES tab in the MRC88 Systems window.
2. In the “SELECT ZONE’ box, select the zone’s Keypad to be programmed.
3. Click the desired Source button on the virtual MRC88 Keypad.
4. Click the Function button you wish to place a command under and select the applicable command
from the palette for that component function. The code name (function/brand/component) for that
button will appear in the Macro Command List on the MRC88 Programming Module.
5. To add additional commands to the same button (i.e. creating a Macro Sequence), just repeat steps 2
& 3. Up to 40 Commands can be placed under each programmable button (See: “Programming
Sequences”)
6. Repeat for all buttons / all sources.
P
ROGRAMMING SEQUENCES (MACROS)
All programmable buttons on the MRC88 Keypad can be programmed to send IR sequences of up to 40
commands (all buttons except for Volume UP/DOWN and STATUS).
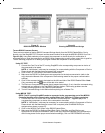
1. Click the button to be programmed.
2. Open all palettes to be used in the sequence.
3. In the palette, click on the commands in the order of the sequence to be sent.
4. The order of the commands in the sequence can be changed by simply dragging the command
towards the desired position in the list. Press and hold the left mouse button with the cursor over the
desired command. While holding, drag the command to the desired position in the list and release.
NOTE: As you drag a command upward in the list and you want the command between two existing
commands, drop it on the lower one. As you drag downward, drop it on the upper one.
T
IMED DELAYS
Timed Delays can be placed in a sequence. This is desired in macros where a delay is needed between
two commands to allow for a unit to respond completely to the previous command (i.e. After a POWER ON
command is given a Delay is usually necessary before the next command will be recognized or when
entering multiple digit channel commands to a CBL or SAT box).
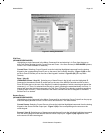
1. Click the left < and right > arrows under “DELAY” in the Macro Command List window for the number of
seconds you want up to 30 seconds (i.e. 2 = 2 seconds) or simply highlight the number in the Delay
window and enter the number using the keyboard.
2. Double-click the word “DELAY” or if entering from the keyboard simply hit ENTER on the keyboard.
This will place the delay at the end of the Command List and the delay time appears on the list (e.g.,
Delay 2 Sec).
3. Left Click and Drag the “Delay 2 Sec” line and drop it between any two commands you have placed on
the Command List.
NOTE: As you drag a command upward in the list and you want the command between two existing
commands, drop it on the lower one. As you drag downward, drop it on the upper one.
R
EPEAT COMMANDS