


Page: 82 Model MRC88
© 2003 Xantech Corporation
ZONE ADJUSTMENTS
These adjustments allow customized bass, treble, balance and maximum level settings to best compliment the
acoustics and preferences for each zone.
1. Go to desired zone.
2. Using an RC68+ select desired INPUT (source).
3. Point the RC68+ at the IR sensor on the MRC88 Keypad (IR sensor enabled) and press the Z-ADJ
button (18). (This activates the Zone Adjustments mode).
NOTE: Z-ADJ mode allows 10 seconds after each button press for the next command to be executed. If 10
seconds is exceeded, simply press Z-ADJ again. To confirm Z-ADJ mode, press the MUTE ON button. If
the sound mutes, the MRC88 Controller is NOT in the Z-ADJ mode.
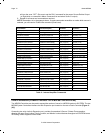
4. While listening to the program material, set BASS (E0, 88, & A8), TREBLE (20, 60, & 08) and
BALANCE (C8, 58, D8) as desired. Repeat this procedure as often as necessary to arrive at a pleasing
tonal balance for the zone.
5. Adjust VOLUME buttons (F0 & 98) for the maximum volume desired for the zone.
6. Press MAX-V button (78) to save this maximum volume setting (this will become the loudest volume
possible in that zone)
7. Set the Volume level to the desired Zone On setting (i.e. the volume setting desired for when a zone is
first turned ON – usually a low volume setting)
8. Press the ON-VOL button (E1). This will now be the maximum volume the Zone can be set to on power
on.
NOTE: The MRC88 remembers the last volume setting on a power down and returns to that level when the
Zone is powered back up. The ON-VOL feature will ensure that if the volume was turned off at a loud
volume setting, when it is turned back on it will always go to the preset level (ON-VOL) setting as a
maximum.
9. Press the ADJ-OFF button to drop out of the Z-ADJ mode. (Z-ADJ mode will drop out automatically
after 10 seconds).The Z-ADJ settings are now saved, completing the procedure.
10. Repeat steps 1 through 7 for each zone.
KEYPAD ADJUSTMENTS
The sensitivity of the keypads IR Receiver and the LCD backlight adjustment can be made via adjustment
screws on the rear of the Keypad.
IR
SENSITIVITY ADJUSTMENT
The IR Receiver on the Keypad can be adjusted for sensitivity to avoid possible interference from background
light level to prevent false triggering of the IR circuits.
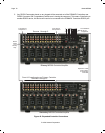
1. In bright light environments, if the keypad LED sometimes flickers red, use the enclosed small blade
screwdriver to adjust the sensitivity of the IR sensor adjustment screw [Figure 5-(20)].
2. Slowly turn clockwise to reduce sensitivity until interference no longer affects IR sensor performance.
LCD
BACKLIGHT ADJUSTMENT
Adjusts brightness of LCD backlight. This adjustment does not affect the backlight level for the buttons.
To reduce or increase brightness of the LCD on the Keypad, slowly turn the LCD Adjustment screw [Figure 5-
(21)] clockwise to reduce or counter-clockwise to increase brightness of the LCD on Keypad to set to desired
level.