


Model MRC88 Page: 41
© 2003 Xantech Corporation
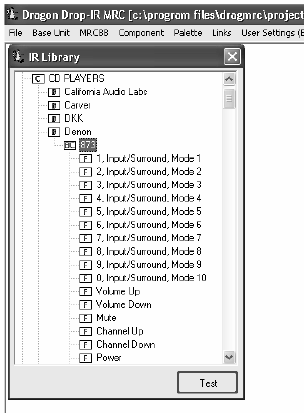
1. With the IR Library opened to the specific manufacturers list of Command Groups as outlined above,
click on the first Command Group listed (i.e. Cmd Group1). A list of all of commands associated with
this component should be displayed.
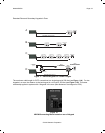
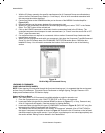
2. Connect an Emitter to the COMMON emitter port on the rear of the MRC88 Controller/Amplifier –
Figure 3-(27).
3. Place the emitter over the sensor window of the component to test.
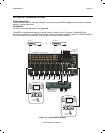
4. With the PC still connected to the MRC88 Controllers programming port, select “TEST” in the Palette
Editor. The TEST button will be outlined red.
5. Click on the POWER command or other basic function command as listed in the IR Library. The
controlled component should respond to each command sent.(i.e. “Power” turns the source ON or OFF,
“PLAY” plays the content etc.)
6. If a component does not respond to a command, click on another Command Group listed under that
manufacturer and retest.
7. When you find a listing that works with your component, right down the Component Type/Mfr/Command
Group # in the IR Filename area of the PLANNING THE SYSTEM section above. Check the box
labeled IR Library. You will need to remember the location of all commands for use in the following
section.
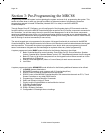
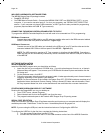
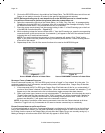
Figure 16
Built-In Mfg’s IR Command Library
LEARNING IR COMMANDS
(BASIC/ADVANCED/EXPANDED)
NOTE: When learning IR commands through the front panel learning-eye, it is suggested that the environment
be free of any IR interference. This could include Fluorescent or Halogen lighting, sunlight, Plasma or LCD
displays and interference from PC Monitor display.
U
SING THE PALETTE EDITOR
NOTE: The Palette Editor for IR Commands is available whether a project is opened or not.
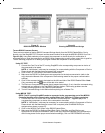
1. From the Component menu, click “PALETTE EDITOR” or hit F3 on your keyboard.
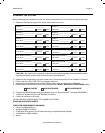
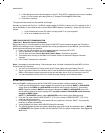
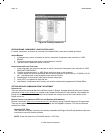
2. Locate and Select (single click) the desired BRAND as shown in Figure 17 (i.e. Sony, Panasonic etc).
A list of Components will appear. (See later section for ‘Adding Brands’.)
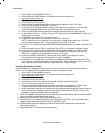
3. Locate and Select (single click) the type of COMPONENT as shown in Figure 18 (DVD, SAT etc) (See
later section for ‘Adding Components and Functions’).
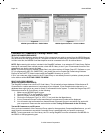
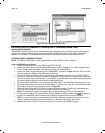
4. The Palette Editor will now be open to the “Brand” & “Component” selected. A list of FUNCTIONS for
that type of component will appear as shown in Figure 19. Review the list of Functions on the left hand
side and compare to the source remote. If your function is not displayed or not named appropriately see
the section entitled ‘Editing Function Names in the Palette Editor.