


48
To stop recording
Press x. Note that it may take a few seconds for
recording to stop.
To pause recording
Press X. To restart recording, press the button
again.
To watch another TV programme while
recording
If your TV is connected to the LINE 1-TV jack, set
your TV to the TV input using the
t TV/DVD
button and select the programme you want to
watch. If your TV is connected to the LINE 2 OUT
or COMPONENT VIDEO OUT jacks, set the TV
to TV input using the
t TV/DVD button
(page 98).
z Hint
If you do not want to watch TV while recording, you can
turn off the TV. When using a decoder, make sure to
leave it on.
Notes
• After pressing z REC, it may take a short while to start
recording.
• You cannot change the recording mode while
recording or during recording pause.
• If there is a power failure, the programme you are
recording may be erased.
• You cannot watch a PAY-TV/Canal Plus programme
while recording another PAY-TV/Canal Plus
programme.
Using the Quick Timer function
You can set the recorder to record in 10-minute
increments.
Press z REC repeatedly to set the duration.
Recording starts after the first press. The Quick
Timer starts from the second press, and then each
additional press increases the recording time by 10
minutes within the available free space on the disc.
The remaining recording time appears
momentarily on the TV screen.
The time counter in the front panel display
decreases to 0:00 (or when the disc is full), then
the recorder stops recording (power turns off).
To check the Quick Timer
Press z REC once while recording. The
remaining recording time and other recording
information (programme position, recording
mode, etc.) appear momentarily on the TV screen.
To cancel or stop the Quick Timer
To return the recorder to normal recording mode,
press z REC twice while recording. [Continue]
appears momentarily on the TV screen.
To stop recording, press x. Note that it may take
a few seconds for recording to stop.
To extend the Quick Timer
Press z REC repeatedly while recording. After
the recorder returns to normal recording mode, the
recording time extends by 10 minutes (up to the
capacity of the disc).
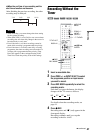
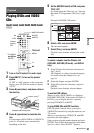
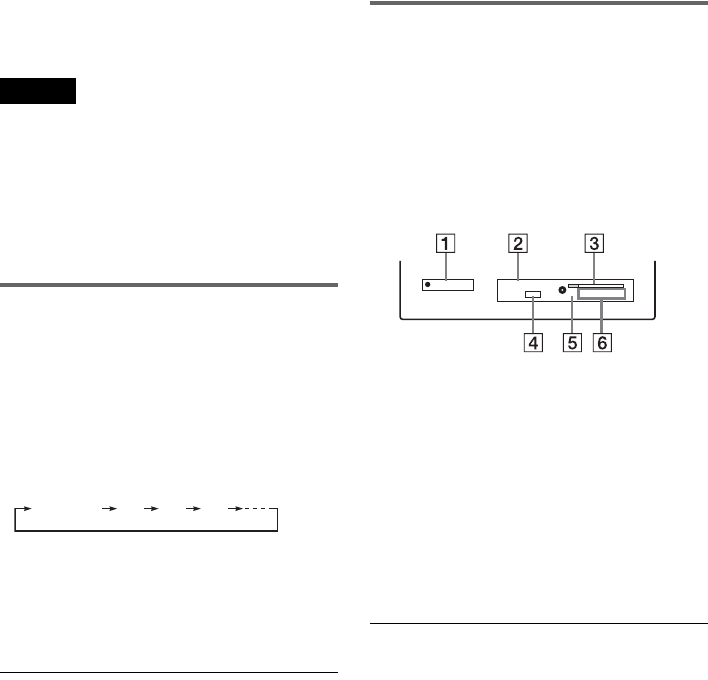
Checking the disc status while
recording
You can check recording information such as
recording time or recording mode, etc.
Set the AMP/DVD switch to DVD, and press
DISPLAY during recording.
Recording information appears on the TV screen.
A Elapsed recording time
B Programme position or input source
C Recording status bar
D Audio channel
E Recording mode
F Available recording time for the disc
Press DISPLAY to turn off the display.
z Hint
While recording, you can check the recording time and
other information, such as disc type/format, title/chapter
10M 20M 30M
Continue
0:19:55
SP 1H 40M Free
MONO
Input : Pr. 8